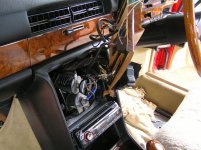
Removal of Instrument and Switch Panel

More threads by Styria

Styria

The Godfather
Moderator
Messages
9,382
Points
492
Location
Sydney
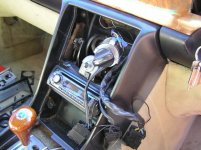
Hi all, one of the most tedious jobs on a 6.9 and most 116s relates to the removal of the above mentioned components, particularly the switch panel that incorporates the slider heater/fresh air controls and the rotary dials for the Air Con. and Fan.
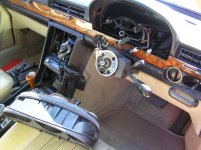
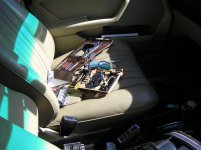
TechnicalPictures018.jpg

TechnicalPictures019.jpg

TechnicalPictures020.jpg

There are a number of issues to consider. Firstly, the quite fragile structure of the burr walnut/zebra switch panel. In a round about sort of a way, you virtually need to manhandle the unit to refit it on account of the upper rotary switch.

Secondly, THAT upper rotary switch/dial - whoever dreamed up that arrangement with the utterly and impossibly stiff cable and the wiring loom terminal fitted in the opposite direction (therefore having to twist it 180 degrees), they should have their retirement fund discontinued. It has got to be one of the worst arrangements I have ever had to deal with.

Thirdly, that upper dial is 'free floating' - in other words, nothing to hold it in the first place. The bottom dial isn't too bad as it is a fixture on an albeit very flimsy plastic cross bar and again you have to be so careful not to break it. But the top - terrible ! The cable and loom push so hard away from the timber switch panel, and you have the added obstruction of the other wiring looms that deal with the sunroof etc. Add to that the wiring for the tiny lights for those upper switches, and you really have frustration colossiale on your hands trying to refit everything, properly, without breaking or damaging any of the components. Just a nightmare. Regards Styria
 

Michel

The Prince of Arabia
Moderator
Messages
10,021
Points
775
Location
Sydney, Australia
Add to that the wiring for the tiny lights for those upper switches, and you really have frustration colossiale on your hands trying to refit everything, properly, without breaking or damaging any of the components. Just a nightmare. Regards Styria


CryingSmiley-1.jpg
 
OP
Styria

Styria

The Godfather
Moderator
Messages
9,382
Points
492
Location
Sydney

I don't know what the blue eyed, yellow faced 'thingy' stands for, but it looks appropriate for the thread which, in itself is characterized by the absolutely new and brilliant expression "Frustration Colossiale" (don't you guys agree ?), so appropriate for certain aspects of 116 ownership. Oh, now I see - "Crying smiley" - well.............
 
Last edited:

6.9forever

Noble
Messages
267
Points
125
Location
Sunshine Coast
Hi Styria -

My sliders are still jammed/locked-off in the down position so they didn't cook me last summer. Remember the cams over-rotated? What with the heated seats I didn't miss the cabin heating much this winter. Along with re-gassing the air-cond, I need to see you soon as the weather starts to warm up ...
 
OP
Styria

Styria

The Godfather
Moderator
Messages
9,382
Points
492
Location
Sydney
Hi 6.9forever, whenever you've got yourself organized, just let me know. Getting to the flaps involves the removal of both front seats and the gearbox console. It's then that one can gain access to the lower part of the heater box which contains the heater/distribution flaps.

What I find a nusance is the connecting lever that operates an additional dividing flap that's an internal part of the bottom section of the heater box. The flaps themselves are in fact attached and are part of the main heater box.

All in all, a fairly difficult and fiddly job. Another gripe on my part relates to the comfort factor - there is none as you can't sit or rest anywhere unless it's on the gearbox tunnel floor and that's not particularly comfortable. Regards Styria
 

6.9forever

Noble
Messages
267
Points
125
Location
Sunshine Coast
Hi Styria -

Getting myself organised ... hmmm, that's the challenge. But it will be done soon I hope.

In the meantime, Father's Day prevents me from getting to the MB Club concours with my 6.9 (as a visitor only of course). That, and tickets to see the Swans take on Carlton at Homebush.

Go Swannies!

Have a great day and thanks for calling me about it.
 
OP
Styria

Styria

The Godfather
Moderator
Messages
9,382
Points
492
Location
Sydney
You're most welcome - enjoy the Aussie Rules game and go the Manly Sea Eagles ! :D - that'd be more appropriate, wouldn't it be ? Anyway, have fun - look forward to seeing you sometime in the near future.

Regarding THAT switch panel - I guess practice makes perfect, such as it can be. The other day, it took me the best part of four and a half hours - but I had to do it twice. but I have now got it done to a fine art. The procedure is as follows:

First job is to connect up the thin optic light wires to the respective terminals located right near the tine globes that are fitted at the back of the switch panel. Also ensure that the wiring for the small centre light bulbs will not interfere with the bodies of the two rotary dial switches. Next step is to feed the optic wires to the respective switches for the sunroof, rear window demister etc. Now, you have to reach behind the switch panel and fit the threaded portion of the upper dial to the back of the switch panel and at the same time lower it at an agle far enough to push it upwards into the recess of the forward leading portion of the gearbox tunnel. Then endeavour to slide the switch panel onto the threaded portion of the lower rotary switch/dial. One will also need to ensure that the upper switch/rotary dial does not move from its designated position with the white arrow of the switch pointing downwards.

It is best to have the radio removed as well in order to facilitate the correct positioning of the bottom of the switch panel which is secured to the thin plastic bar (just above the radio) by means of two self tapping screws.

Hope this helps the next guy that is going to do some work in that section of the car. BTW, I recall when I did this work about twelve years ago, and for the first time, on Gleaming Beauty. I had absolutely no idea what the optic wires stood for, and what function they were performing. Some of the wires are not easy to remove from various sections at the rear of the panel, so I simply cut them and reconnected them in due course with crimped connectors - obviously, the cutting of the optic wires destroyed them. In those days, everything was trial and error and having to find things out things the hard way. Regards Styria

It'd be nice to illustrate by way of pics - hmmm.......


TechnicalPictures024.jpg
 
Last edited:

6.9forever

Noble
Messages
267
Points
125
Location
Sunshine Coast
Ah Styria - I am totally passionate about our great indigenous game. And 41,500 others were at Olympic Park as well so it is a movement!

I would love to learn how to do this job - and get my slide controls and cabin temp sorted as well. Alas, I will turn to you for help and see you as soon as I am "organised".
 

6.9forever

Noble
Messages
267
Points
125
Location
Sunshine Coast
... and of course the Swans won a nail-bighter against Carlton and now take on the Bulldogs (with ex-Swan Barry Hall in the forward line) at the MCG next Saturday night in a Preliminary Final, 2 weeks out from another shot at a premiership!
 

SEL_69L

Aristocrat
Messages
1,320
Points
95
Location
Sydney, NSW, Australia
It seems to me that w116's were designed so that they could be built and not necessarily easily repaired, (just like any other car). I shudder to think of the cost of major repairs in 20 or so years time to a C63 AMG.

Small car (relatively), big and expensive engine, brakes and transmission, with rare parts, and difficult to repair, with little space to work within. Ouch.
 

6.9forever

Noble
Messages
267
Points
125
Location
Sunshine Coast
Yep - that's why my 32-y.o. 6.9 is a keeper but my new-fangled Mercs get traded every 4 years when the lease is up. They are sooooo/tooooooo complicated!
 
Similar threads
Thread starter Title Forum Replies Date
WGB Instrument Cluster removal 101 Articles 3
S Paintless Dent Removal Exteriors and Body Repairs 1
T Soft top removal Mercedes R/C107 3
A oil pan removal 6.9 Mechanicals 1
H Igntion Barrel removal Technical Information 14
Styria Removal of battery Mechanicals 11
Oversize Rust removal by electrolysis Exteriors and Body Repairs 1
WGB Rear Screen removal and replacement Interiors 2
mrkozzy Rear windscreen glass removal - Any tips? Exteriors and Body Repairs 17
mrkozzy Ignition switch removal Interiors 4
Styria Valve Body Removal Technical Information 2
L Dashboard Removal? Interiors 4
L Power Window Removal Technical Information 1
L Sunroof Frame Removal Technical Information 1
BIGBENZ Engine removal Mercedes W116 3
Styria Removal of sunroof frame Interiors 5
Styria Removal of 6.9 engine oil tank Mercedes W116 4
Styria Removal of Steering Box Mechanicals 19
abl567 6.3 Transmission removal Mercedes W108 and W109 0
Styria Removal - 6.9 rear suspension valve Mechanicals 0
Styria Removal of 6.9 Master Air Cell Mechanicals 1
Styria 6.9 water pump removal Mechanicals 4
Styria 6.9 removal of heads Mechanicals 32
Styria Removal of 6.9 Water Pumps Mechanicals 4
s class Paintless dent removal Exteriors and Body Repairs 4
s class Att Lukas : ceiling trim removal Interiors 5
L W116 Sunroof Removal for Dummies Technical Information 42
Styria 6.9 Water Pump Removal Mechanicals 4
WGB Right side axle shaft removal in a 6.9 Technical Information 7
s class 6.9 sump removal Mechanicals 8
SELfor50 Removal of A/C & Cruise Control Mechanicals 6
TJ 450 Washer pump removal on 6.9 Mechanicals 3
Oversize W116 Instrument Clusters Interiors 21
K W116 Instrument Cluster Gumtree/eBay/Facebook Listings 0
B FS: W116 instrument cluster rubber band - holds binnacle in Gumtree/eBay/Facebook Listings 1
s class unusual and messy instrument failure Mechanicals 7
B WTB: Instrument cluster 350SE (or just the speedo) Gumtree/eBay/Facebook Listings 2
c107 battery disconnect switch Mercedes W110, W111 and W112 0
Michel Hazard Warning Switch Gumtree/eBay/Facebook Listings 2
S heater decides not to switch off Mercedes R/C107 2
260ebenz Electiric seat switch Mercedes W126 12
S cruise control switch Euro 107 280 SL Mercedes R/C107 7
Styria Rear Window Switch operation Interiors 1
S air con pressure switch Mercedes R/C107 0
S air con pressure switch Mercedes R/C107 7
300SDude Dead Window Switch Interiors 4
Styria Switch panel Interiors 2
SELfor50 Switch Panel & Push Button Start Motorsports 2
BenzLover Re assembling the electric seat switch! Mechanicals 4
BenzBoy Key activated battery isolation switch? Mechanicals 16

Similar threads

Top