Removal of sunroof frame

More threads by Styria

Styria

The Godfather
Moderator
Messages
9,382
Points
492
Location
Sydney
If I recall correctly, it may have been Lukas, or another member from possibly another website, that described logical steps in removing the sunroof frame from a 116 - whether that be SE or SEL. As part of the recent respray of Gleaming Beauty, I had rust bubbles in the roof itself, but I had also been aware even at the time of the previous respray some ten years ago, that there was some rust in the frame, and this would require removal to attend to the rust in the roof itself (at the front leading edge) and I was also prepared to have to fit another non-rusty sunroof frame.

Removal of the frame was a job I did not look forward to. I really was unsure as to the best method of removal from the car itself. I knew seats would have to come out, as well as front and rear screens which I wanted to replace in any case, so I figured to take out the frame through the front or rear screen apertures. Also, I thought that I had read that removal could be effected through one of the door openings. When eventually I got to the stage where the frame was ready for removal, I came to realize that the only way to remove it would be through the front screen. You see, the frame itself has to be pulled clear of the fixed tube that accomodates the cable that operates the sunroof, and it is necessary to move the frame forward to clear that tube.

Anyone have any different ideas ? I would be pleased to hear from you. After removal of the frame, I discovered that rust was not a huge problem and I have cleaned up the frame and painted it with POR 15. It was also surprising just how many bottle brush leaves had found their way in between the frame and the roof itself. Regards Styria
 
Last edited:

WGB

New Member
Messages
1,289
Points
0
Location
Perth Western Australia
Hi Styria,

You may know this and I may be teaching you how to suck eggs but here is a summary of my knowledge.

1) Put sunroof in mid-position and pop the retainers in the leading edge of the interior Cover. Loosen cover and with sun-roof in rear position pull cover out front wards outside from the top.

2) With the sunroof fully open and working from above remove the screws that hold the stainless steel slide covers. Remove only the phillips head screws and do not move the front adjusting cross head screws that are accessible through a hole in both stainless steel covers. Then remove the covers upwards and forwards.

3) Shut the sunroof and remove the cable clip at the forward end of the cable from within the car and the two 10 mm bolts found at either side towards the rear of the sunroof frame. Retract the cable out of the rear of the guide tube and lift the panel upwards and forwards out of the car.

4) Work the sunroof motor and extend the cable until it disengages from the motor and then pull the cable forwards and out of the car.

5) Remove the front, rear and side moulded headliner panels after removing all the assorted lights, mirrors, sunvisors, grab handles and any trim panles with screws in them.

6) Remove the trim at the sides of the sunroof opening.

7) At this point the headlining edges can be seen glued in place and held with small black press fit plastic pieces. If you are going to re-use this headlining it will need to be eased very gently all around until it is all hanging down and supported by the rear edge of the sunroof opening where it is pressed in and about half way towards the rear window where there is a metal bow which is held by tongues and is used to tension the headlining lengthwise. The tongues are visible from the top edge when the headlining is loosened from around the rear window and then left to hang down. The wire bow with it's headliner needs to be pulled backwards to disengage from the tongues and then lowered and the leading edge of the headliner pulled forwards and out of it's groove.

8) At this stage all should be revealed and the sunroof frame mounting screws and the four drain tubes should all be visible.

9) I have never tried to remove a frame with screens in place but it may be possible particularly if the seats are removed but not sure.

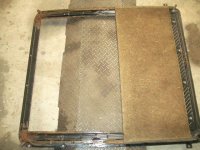
First picture is view of lower side as seen in car when mounted.

RustySunroofFrame.jpg

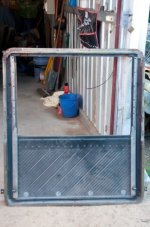
Second picture is view from above - that is the side that is next to the roof

RustySunroof3.jpg

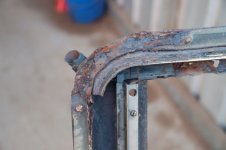
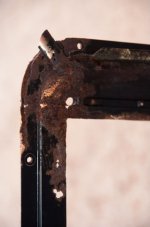
The rust will be around the two forward drains and will need repair or replacement. The mounting in the roof panel will also have some rust and welding and grinding is a challenge from below and made worse if there is any trim left in the car.

Rustysunroof1.jpg

RustySunroof4.jpg

I purchased a new foam gasket between frame and body from M-B a few years ago for about $30, a new complete set of "Sliding Jaws" and the three rubber buffers that stop the wind deflector from rattling were $82.50 and then you have front, rear and side seals if required.

Bill
 
OP
Styria

Styria

The Godfather
Moderator
Messages
9,382
Points
492
Location
Sydney
Hi Bill, thanks for your reply - you know, it is not every day that one removes the sunroof frame from the cars and it is a new learning process each and every time. So far be it for me to think that you may be teaching me to suck eggs. The simple fact is that we need to exchange ideas and clues, usually and hopefully based on actual work experience. That's the idea of a forum - as you know yourself only too well.

When removing the sunroof frame, I did not remove the cable that leads to the sunroof motor - in fact, I wound it back towards the motor as far as was prudent to do so. Of course, the fixed tube that's secured by the two self tappers was still in place and this necessitated moving the complete frame towards the front (to clear the tube) and out the window opening. I can't see any other way of removing it. I also need to point out that I did not remove the two front seats. Their headrests provided excellent support when moving the frame out of the car - I was on my own, without assistance. Regards Styria
 

WGB

New Member
Messages
1,289
Points
0
Location
Perth Western Australia
One advantage of removing the cable is that you can replace it rotated through 180 degrees so that an almost new set of gears will mesh with the gear in the motor itself.

The same trick that was used with ageing Lucas wiper cables.

Bill
 

Lukas

New Member
Messages
651
Points
0
Location
Canberra
Hi Styria and WGB,

The original post is here: TK.

In short, it can be done by removing the frame through the front passenger door, but it is tight - you need to move the gear selector all the way forward or back to make the space.

Leaving the headrests in place is indeed good - they hold up the frame (along with your head, while undoing / re-inserting bolts).

As for the cable, there is a clip at the leading edge of the sunroof that you can remove which will allow you to leave the whole cable in the car.

Parts: I just got a strip of adhesive-backed foam rubber from Clarke rubber for the frame to roof seal, and the sliding jaws etc from either Autohaus or MB Spares - approx $50 I think they were.
 
OP
Styria

Styria

The Godfather
Moderator
Messages
9,382
Points
492
Location
Sydney
Hi guys, we've got a bit of doubling up and, dare I say it, tripling up and Admin. may have to work out some system by combining the whole lot into one thread and putting it in our Technical Section. Regards Styria
 
Similar threads
Thread starter Title Forum Replies Date
L Sunroof Frame Removal Technical Information 1
L W116 Sunroof Removal for Dummies Technical Information 42
S Paintless Dent Removal Exteriors and Body Repairs 1
T Soft top removal Mercedes R/C107 3
A oil pan removal 6.9 Mechanicals 1
H Igntion Barrel removal Technical Information 14
Styria Removal of battery Mechanicals 11
Oversize Rust removal by electrolysis Exteriors and Body Repairs 1
WGB Rear Screen removal and replacement Interiors 2
WGB Instrument Cluster removal 101 Articles 3
mrkozzy Rear windscreen glass removal - Any tips? Exteriors and Body Repairs 17
mrkozzy Ignition switch removal Interiors 4
Styria Valve Body Removal Technical Information 2
L Dashboard Removal? Interiors 4
L Power Window Removal Technical Information 1
BIGBENZ Engine removal Mercedes W116 3
Styria Removal of Instrument and Switch Panel Interiors 10
Styria Removal of 6.9 engine oil tank Mercedes W116 4
Styria Removal of Steering Box Mechanicals 19
abl567 6.3 Transmission removal Mercedes W108 and W109 0
Styria Removal - 6.9 rear suspension valve Mechanicals 0
Styria Removal of 6.9 Master Air Cell Mechanicals 1
Styria 6.9 water pump removal Mechanicals 4
Styria 6.9 removal of heads Mechanicals 32
Styria Removal of 6.9 Water Pumps Mechanicals 4
s class Paintless dent removal Exteriors and Body Repairs 4
s class Att Lukas : ceiling trim removal Interiors 5
Styria 6.9 Water Pump Removal Mechanicals 4
WGB Right side axle shaft removal in a 6.9 Technical Information 7
s class 6.9 sump removal Mechanicals 8
SELfor50 Removal of A/C & Cruise Control Mechanicals 6
TJ 450 Washer pump removal on 6.9 Mechanicals 3
260ebenz Sunroof is now fixed Exteriors and Body Repairs 5
TJ 450 Sunroof frame seals Exteriors and Body Repairs 5
L Sunroof Sagas - The Sunroof "Clutch" Interiors 1
S Feather Bed Frame Websites and Links 0
6.9forever "Frame-off" complete 6.9 restoration Mercedes W116 18

Similar threads

Top