mrkozzy
Never finished
Hi guys.
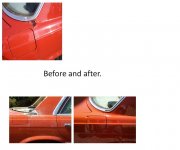
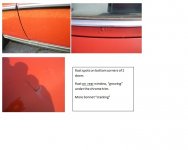
Time time to fix those 3 rust spots under my chrome trim on the back window.
I am having the rear windscreen glass popped next week by a professional windscreen guy. I'm giving him the go ahead to cut the rubber in order to (hopefully) get the glass out in 1 piece. Its original rubber, so its been there since 1975. Obvously there will be a new rubber reinstalled when the panel beater has finished his magic.
My question is...........Even tho the glass is being pulled professionally, there is still a big chance of it breaking, ( I am told). Are there any tips, I can relay to this guy specific to the w116 model that may help him? He readily admited, he hasn't done many of this model.
Any info is appreciated,
cheers