
QLD6point9
Distinguished
G’day all,
Today’s task was removing the rear axle shafts to replace all of the CV boots. One of the boots had torn, so I decided it made sense to replace all of them while everything was apart.
The reason for this post is to hopefully help anyone who finds themselves struggling to remove the rear axle shafts on a W116, particularly a 6.9.
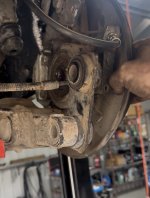
If you’re having difficulty gaining enough clearance to remove the axle shaft from both the wheel carrier and the differential housing, I recommend removing the lower hydropneumatic suspension (HPF) strut mounting bolts from the trailing arm and then pivoting the wheel carrier assembly rearward, as shown in the attached photos.
I spent close to two hours trying different approaches to gain the last few millimetres of clearance required. No matter what I tried, the geometry simply wasn’t favourable enough to allow the axle shaft to come free from both ends at the same time.
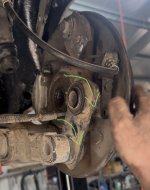
At that stage, I was seriously considering removing the entire trailing arm assembly. Before doing so, however, I noticed that the small link arm attached to the wheel carrier (pictured) was capable of pivoting, allowing the entire assembly to move rearward towards the back of the vehicle. (See photo attached and in particular green arrows demonstrating the range of movement).
Once this movement was utilised, the additional clearance required became available and the axle shaft could be removed without further disassembly.
For some owners this may be obvious, particularly those who know these suspension systems inside and out, but for me it was a useful discovery and one worth sharing.
I think it also highlights an important aspect of vehicle restoration and repair: when something doesn’t seem to fit or come apart, it’s often worth stepping back and reconsidering the geometry and design of the system before reaching for the next spanner. More often than not, the engineers who designed it had a method in mind; sometimes it’s simply a matter of finding it.
As for the repair itself, I had purchased a complete set of FEBI boot and housing assemblies manufactured to the original Mercedes-Benz specification, including the black canister housings for the CV joints. In the end, however, I opted for the simpler and less purist approach.
Each housing was cleaned and inspected, fresh grease was added where required, and I used four universal stretch boots together with a boot expander tool to install the new boots over the existing assemblies.
The one boot that had torn was carefully flushed to remove any contamination, thoroughly dried, and then repacked with fresh grease before reassembly.
All in all, another productive day spent on the 6.9.
I’m making the most of the unexpected time off while Queensland Rail is experiencing industrial action. It certainly provides a good opportunity to spend time on the projects we’d rather be working on anyway!
Hopefully this information helps the next person tackling the job.
Today’s task was removing the rear axle shafts to replace all of the CV boots. One of the boots had torn, so I decided it made sense to replace all of them while everything was apart.
The reason for this post is to hopefully help anyone who finds themselves struggling to remove the rear axle shafts on a W116, particularly a 6.9.
If you’re having difficulty gaining enough clearance to remove the axle shaft from both the wheel carrier and the differential housing, I recommend removing the lower hydropneumatic suspension (HPF) strut mounting bolts from the trailing arm and then pivoting the wheel carrier assembly rearward, as shown in the attached photos.
I spent close to two hours trying different approaches to gain the last few millimetres of clearance required. No matter what I tried, the geometry simply wasn’t favourable enough to allow the axle shaft to come free from both ends at the same time.
At that stage, I was seriously considering removing the entire trailing arm assembly. Before doing so, however, I noticed that the small link arm attached to the wheel carrier (pictured) was capable of pivoting, allowing the entire assembly to move rearward towards the back of the vehicle. (See photo attached and in particular green arrows demonstrating the range of movement).
Once this movement was utilised, the additional clearance required became available and the axle shaft could be removed without further disassembly.
For some owners this may be obvious, particularly those who know these suspension systems inside and out, but for me it was a useful discovery and one worth sharing.
I think it also highlights an important aspect of vehicle restoration and repair: when something doesn’t seem to fit or come apart, it’s often worth stepping back and reconsidering the geometry and design of the system before reaching for the next spanner. More often than not, the engineers who designed it had a method in mind; sometimes it’s simply a matter of finding it.
As for the repair itself, I had purchased a complete set of FEBI boot and housing assemblies manufactured to the original Mercedes-Benz specification, including the black canister housings for the CV joints. In the end, however, I opted for the simpler and less purist approach.
Each housing was cleaned and inspected, fresh grease was added where required, and I used four universal stretch boots together with a boot expander tool to install the new boots over the existing assemblies.
The one boot that had torn was carefully flushed to remove any contamination, thoroughly dried, and then repacked with fresh grease before reassembly.
All in all, another productive day spent on the 6.9.
I’m making the most of the unexpected time off while Queensland Rail is experiencing industrial action. It certainly provides a good opportunity to spend time on the projects we’d rather be working on anyway!
Hopefully this information helps the next person tackling the job.
Attachments
-
 IMG_7549.jpeg257.7 KB · Views: 1
 -
 IMG_7550.jpeg254.2 KB · Views: 1