Starter Re-Assembly

More threads by Lukas

Lukas

New Member
Messages
651
Points
0
Location
Canberra
Can you see a pattern here? :(

Okay, so I pulled the starter apart, cleaned it and re-greased the greasy bits. Everything seems in order mechanically and there is plenty of life left in the brushes.

Come re-assembly time, the question arises: how do I "restrain" the 4 brushes so I can re-insert the rotor?

The 4 stator coils are attached via large and shallow (and very tight) individual screws to the starter's housing, and the end cap seems to be an interference fit (also very tight) over the end of the housing. This means that there is no access to the brushes end of the assembly, and thus no way to pull the brushes back while re-inserting the rotor. As I see it, options are:
  1. If I could remove the 4 stator screws (I've tried, even made a custom screwdriver bit - no luck), I think the whole assembly will come out, brushes and all. Once the rotor is inserted, getting the whole lot back in will be tricky, but should be do-able.
  2. If I could prise the end cap off, there would also be ample access, and no tricky re-insertion.
  3. Some sort of tricky thing with a ring of wire holding the brushes back: insert rotor, pull wire out.....

Even contemplated drilling small holes in the sides of the end cap, to pass wire / zip ties through to restrain the brushes, but then you have holes in your starter to patch.

Suggestions please, especially if it's a "known good" method. Have photos, but different computer sorry.

Ta

Lukas
 
Last edited:

Styria

The Godfather
Moderator
Messages
9,391
Points
622
Location
Sydney
Hi Lukas, I am sorry that I can't help you. The last starter motor I had re-built by my Auto Electrician. The cost was quite reasonable (about $280.00) with a twelve months warranty and no headaches on my part. Auto Electrics need an expert, and I am not one of those. As a matter of interest, was there any reason for you to want to pull it apart ? Also, interested if you're doing anything else with your cars. Regards Styria
 
OP
L

Lukas

New Member
Messages
651
Points
0
Location
Canberra
Hi Styria,

Pulled it apart because it wasn't engaging the flywheel every time. I did see your $280 price, but after a certain 450 I'm trying to save pennies for a while. I'll try to get the pictures up so you can all see what I'm on about.

Lukas
 

Oversize

Grand Master
Messages
5,753
Points
596
Location
Melbourne
I'm visualizing the problem, but pics would be helpful. If it was assembled before I'm sure it can be re-assembled. I'll bet an auto-elec would have an idea how to hold the brushes back while the commutator is re-installed... An absence of holes for some type of securing pin/s leaves me scratching my head.
 
OP
L

Lukas

New Member
Messages
651
Points
0
Location
Canberra
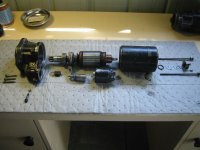
OK, got organised. Below is the exploded view of the starter.

Starter-Exploded.jpg

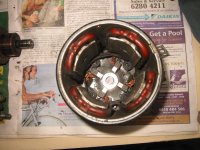
And here is the view looking down inside the stator:

Starter-Internals.jpg

The brushes are the 4 shiny rectangular things around the round shiny thing in the centre (which is the hole the end of the shaft passes through).

From the top photo you can see that the end cap is pressed on, and has no holes around the edges. The only holes are the 2 in the end of the end cap, where the little covering cap screws on. The shaft protrudes through the large centre hole before holding the brushes back becomes required, so you can't use that as part of a means to restraing the brushes.

As above, I think the safest option would be to prise off the end cap, but want to be sure that is both do-able and reversible before I go and break a starter.

Lukas

PS - you can just see the circular hole in each of the 4 metal plates that hold the stator coils in - that is the end of the screw holes for the 4 flat screws that hold them, coming in from the outside. If those 4 screws could be undone the coils would come out, and the springs and brushes below hang off the same assembly. Even if I could loosen them, not sure I'd want to take them out, as getting everything back in again and lined up properly would be tricky.
 
Last edited:

Oversize

Grand Master
Messages
5,753
Points
596
Location
Melbourne
Lukas I think your PS is exactly how it must be done. Make sure you carefully mark the position of everything BEFORE disassembly. Does it look like the brush plate is attached to the end plate in some manner?? I'd seriously doubt it'd be free floating down there. Maybe it's rivoted to the end plate? Can you post a pic of the housing from the other end?

I definitely wouldn't be prizing off the end cap!!!! It looks like pressed metal only (ie not very strong) and applying force may only result in a buggered motor.... If the brush plate is welded to the end plate and you try prizing that off without undoing the four large phillips head screws, you may find you damage the internal wiring between the brushes and the windings. Hopefully once you've removed the screws, the end plate will just slide off the main body and the magnets and windings with come out with it.
 
Last edited:

Oversize

Grand Master
Messages
5,753
Points
596
Location
Melbourne
Judging by the photos of the Holden starter, the brush plate is held onto the inside of the end cap by the 2 bolts that secure the bearing cap. In that case the end cap should be removeable without much trouble. Try soaking it overnight with a little WD40 and then twist it a little as you pull... You may find it's more difficult with the cable out the side.
 
OP
L

Lukas

New Member
Messages
651
Points
0
Location
Canberra
Thanks all - soaking the end cap is a fine idea: non-destructive and all. Shall give it a try and report back.

Confirm there are no other screws \ bolts \ etc holding the brush plate to the casing - the whole brush assembly is "hanging" off the stator coils (it moves about a little, but would ordinarily be held firm by the rotor passing through the centre hole). The linked image from the old Holden site shows it well - the cap is not attached to anything else (except the main body of the housing).

Stay tuned.....

PS - confirm that the 2 screws from the bearing cap also secure the brush assembly.
 

charlottesbutler

New Member
Messages
25
Points
0
Location
Bass Coast Australia
Mark. Explanation:
The bronze bush held in the end cap serves as a sacrificial bearing for the steel shaft. They are presoaked in ordinary engine oil, which is absorbed by the sintered metal of the bush. If they dry out, or if a solvent (wd40, kero, petrol) removes the oil, it will wear out quickly or even seize. Wear creates a wobble which also wears out brushes. Resoak the bush in situ by putting oil into it with the cap on its back. Drain well before reassembly. The cap is not pushed far onto the motor body, and should only need a couple of sideways taps with a plastic mallet. I spent a year rebuilding these for an auto electrician, and also dizzies and alternators. Bosch are good and tough, Nippon Denso even better, and Lucas with a c are a waste of time. Most alternators have the pinholes you were looking for, but not starters. OK?
Rod
 

charlottesbutler

New Member
Messages
25
Points
0
Location
Bass Coast Australia
Lukas
I just re-read your reason for the stripdown. Just in case the solenoid is also faulty, and too weak to throw the pinion properly, carefully clamp the assembled starter in a vice or clamp (there is a lot of torque in these motors) and apply 12 volts to the correct terminals. There will be a spark, so don't do this near a petrol bath! Observe the throw, and get more advice from your local Autoelec if all is not well. Saves time wasted refitting and then finding there's still a problem. New solenoid is quick and easy to fit. A rebuild kit for the solenoid is about $26 if you prefer that.
Rod
 
Last edited:

Oversize

Grand Master
Messages
5,753
Points
596
Location
Melbourne
Rod I think you may've solved a problem I had with Titanic's generator!!! I had the bearings replaced by an auto elec and was careful not to over-tension the belt, but it developed the bearing noise again after a only short amount of time. It does have bearing oiler points (and I did add oil), but is it possible the bearings would chew out quickly if they're not presoaked?
 

charlottesbutler

New Member
Messages
25
Points
0
Location
Bass Coast Australia
Hi Mark

We used to store new bushes in a jamjar full of oil, so that they would be ready to use. If your Autoelec supplied them dry, yes you should soak them as described in the Holden site before installing. A surface coat will soon boil off. They need to be impregnated!

If the bush had been neglected for a long time, it is just possible that the bush housing has been worn larger, and a new bush would possibly spin in the housing and screech a bit. If your bearing noise was a rumble, that suggests a ball bearing in need of grease or replacement.
Some starters use a proper ball bearing at the pinion end, and these should be greased with hmp, not oiled. Ease out one of the seals and wash out the old grease, press new grease well in as you roll the bearing round and reseal; wipe off and refit. Safety - never use an airgun on a bearing to dry it. Guide dogs are expensive.

If one end has ever been allowed to wear badly, the other will suffer also from the eccentric spin and the torque involved, and both should be replaced. Once off the vehicle, this is a quick and rewarding job, done in an hour.

I didn't think to mention that, when the motor is stripped down, it's also good to inspect the copper commutator, which has grooves between the sections of copper running in line with the shaft axis. In time this assembly wears down, the grooves become flush with the copper or fill with graphite dust off the brushes, reducing efficiency. This can be washed off in petrol. air dried and then scraped out. Use a broken hacksaw blade with one end ground to a curved point, and you run this along each groove to cut them a little lower. Take care not to cut the lacquer on the windings of the armature. The copper may show small wear grooves which are usually turned down on a lathe. A strip of very fine emery paper does a reasonable job too.

I hope this helps.
Rod
 
OP
L

Lukas

New Member
Messages
651
Points
0
Location
Canberra
Quick update: the end cap came off quite easily, and all is well. Unit is re-installed and awaiting test, once I figure out my new issue (radiator fan).

Rod: sorry, didn't see your posts until just now. In short:
  • Oil soak: did not do - interesting though, will see how it runs. No signs of oil being there previously. The rotor shaft is well supported by the end cap, although the brushes obviously do make contact too.
  • Commutator cleaning: did do, with fine sand paper and a soft cloth in the grooves.
  • Test of throw: did not do - will see how it runs in the car. Not sure of the polarity of the connections anyway.

No pics yet sorry, technical difficulties. Also, the starter is heavy when lying on your back under a car. Also #2: I'm getting a hoist.

Thanks all,

Lukas
 

Oversize

Grand Master
Messages
5,753
Points
596
Location
Melbourne
Oh bugger!! The joys of DIY!! At least you'll have satisfaction when she's fixed!!! :)
 

charlottesbutler

New Member
Messages
25
Points
0
Location
Bass Coast Australia
Lukas: Sorry for late response. Historic Cars and the Island kept me busy. Re kit, Autobarn or a local AutoElec or Repco, all should be able to order a kit. Be sure it's for your unit, which will have a number on it. A quick search just now also found this random hit. http://www.ebay.com.au/itm/BOSCH-STARTER-SOLENOID-REPAIR-KIT-/150655586104

You might even consider borrowing a known good solenoid for comparison in service.

If you are willing to remove the unit again now, check first on the condition of the gear itself. Any chips or severe wear of the faces which engage with the flywheel? I think that Benz uses an integral flywheel/ring gear unit. Rotate the dead engine to inspect all round for wear or missing teeth on the ring gear. Look through the gap where the starter was for a clear view. If it is damaged, you will get random failure to engage, depending on how the motor stops. Ignore this damage and you will just ruin a good starter. I do hope that's not your problem.

Good luck,
Rod
 

Oversize

Grand Master
Messages
5,753
Points
596
Location
Melbourne
If it's the ring-gear I'd suggest she'll be making a horrible grinding noise before the starter free revs.....
 

Similar threads

Top