How to Change Your Coolant

More threads by Oversize

Oversize

Grand Master
Messages
5,751
Points
596
Location
Melbourne
Here's the method I've developed to change coolant. It can be adapted to almost any car:

1. Jack up the car (don't forget to drive it on some small timber ramps first, so the trolley jack will fit),
2. Put safely on axle stands,
3. Have a big floor squeegee on hand,
4. Put a large container (or several) under the radiator, expansion tank and back of the engine (otherwise you’re about to make a huge mess!). I intend to cut down a 1000L plastic water tank so it forms a small pool. I've used a kid's wading pool in the past, but it won’t last long if you drag it across the concrete when it's full of water!
5. Remove the radiator cap off (cold only),
6. Drain the radiator via the bottom hose,
7. Disconnect the top hose at the radiator,
8. Disconnect both heater hoses at the back of the engine,
9. Remove the coolant drain plugs from the block (I've never tried on a 6.9L),
10. Remove the containers from under the car,
11. Discard the old coolant into the sewerage (not the storm water),
12. Reposition the containers back under the car,
13. Fit a trigger nozzle to a garden hose,
14. Blast mains pressure water into the expansion tank, radiator top neck and heater hoses until it comes out clean,
15. Alternate between directions through the heater core,
16. Reconnect the bottom hose without the clamp, just enough to hold water (if you push it on too far, it's too hard to remove/refit several times),
17. Refit the block drain plugs only enough to stop water escaping,
18. Rapidly fill the system with water through expansion tank until it runs out the heater hoses and the top neck of the radiator clean,
19. Drop the bottom hose and allow the water to rush out quickly (the large volume of water rushing out will eventually clean the insides nicely),
20. Repeat refill and drain as many times as necessary until the water comes out clean (alternate filling between the expansion tank, heater hoses and radiator top neck),
21. Remove all the full containers from under the car and empty on the lawn,
22. Replace the block drain plugs if badly corroded (clean the threads with a wire wheel if they're just dirty, but still usable),
23. Refit the block drain plugs with new washers (do not over-tighten them),
24. Replace hoses where necessary,
25. Replace all the hose clamps with Wurth Zebras (which won't badly bite into the hoses and cause them to burst when it’s inconvenient),
26. Reconnect all the hoses,
27. Mix 50% distilled water & 50% MB or OEM coolant (don't use generic stuff) into a clean 20L container,
28. Decant some of the coolant mix into a 2L container and using a funnel refill the cooling system to a level half-way between minimum and maximum,
29. Remove the stands and drop the wheels onto the timber ramps,
30. Remove (hopefully) your trolley jack,
31. Drive off the ramps,
32. Drive back onto the RHF ramp only (this will keep the expansion tank as the highest point in the system),
33. Run the engine with the heater on and the radiator cap removed until hot (to remove all air pockets),
34. Refit the radiator cap,
35. Drive off ramp,
36. Test drive a short distance, while keeping an eye on the temperature,
37. Drink beer (or spirits)!!! :D

You can get away with only disconnecting one heater hose, if you know what you're doing. On a 6.9, you may be lucky to disconnect them at all, due to accessibility problems! However the flush won't be as thorough if you don't disconnect at least one.

This could take half the day, but you won't have the do it for 2 years! In fact, I've heard the coolant can last up to 5 years if mixed with the correct concentration of distilled water.... Job done!!! :D
 
Last edited:

Tony66_au

New Member
Messages
2,306
Points
0
Location
Gippsland, Vic
Nice!

The large Bungs for cooling system orifices are usually $20 or so dollars at Repco or similar and often come with a click on hose fitting if you want tu use it, I also used to drill and tap a small bolt hole in the top of thermostat housings or the highest point in the water jacket to bleed off any air without having to rely on the engine running and I suspect that on an M117 is would be near the AAV location.
 

Tony66_au

New Member
Messages
2,306
Points
0
Location
Gippsland, Vic
BTW, Used coolant goes into the same place as used engine oil.

If you get reported pouring coolant down a drain the EPA may turn nasty, I used to add it to my waste oil.

And if you are really keen on doing it right you can buy large fluid trays to go under the car, getting cheaper all the time too!
 

Styria

The Godfather
Moderator
Messages
9,370
Points
492
Location
Sydney
Well Mark, that's as comprehensive a list as I have ever seen and, as you say, it is extremely time consuming. I must admit to never having done it as thoroughly as you suggest. I haven't looked at the welsh plugs for a while, but removing those would take half a day at least (I should think), if one can get to them in the first place. I also like your idea of the Wurth hose clips - those made by Tridon bite into the rubber.

I have flushed the cooling system twice on Gleaming Beauty, and also on the Astral Silver 6.9 that is now owned by ChrisP. in Western Australia - I wonder if he still has that car ? (Just as a matter of interest). In my situations, this work was done at valve grind and de-coking time, with both water pump and water pump housing (which is attached to engine block) removed from the car, and radiator out as well (normally have those professionally serviced). With housing and pump removed, you can actually feed a garden hose well into the water jackets and the high pressure does remove a lot of the sediment that settles in the engine block. I also use compressed air, particularly when the heads have been removed from the car. Regards Styria
 
OP
Oversize

Oversize

Grand Master
Messages
5,751
Points
596
Location
Melbourne
It's probably a good idea to blow out (with compressed air) the water in the heater core after it's flushed too. Not doing this step will mean the new coolant will be (slightly) diluted.

Using bungs, compressed air and mains water can help loosen stubborn sediment; but one must be careful.

Does a 6.9 (or 6.3) have coolant drain plugs in the block? Or do they just have welsh plugs? From memory they're a large threaded type and I'd imagine they'd be a nightmare to remove if corroded....

Tony I'd been told putting coolant with sump oil contaminates it and makes it unsuitable for recycling.... I thought it'd be ok to pour used coolant down the sewer access opening (generally in the backyard near the laundry), or into the laundry trough. This means it heads to the sewage treatment plant, instead of into storm water, creeks, rivers and eventually the ocean... :eek:
 
Last edited:

Tony66_au

New Member
Messages
2,306
Points
0
Location
Gippsland, Vic
ethylene glycol is a hydrocarbon like fuel or oil mate and the rule is if you wouldnt drink it or if it isnt the by product of something youd eat or drink ten it doesnt go down the gully trap.

I have a 1000 lt stillage I store waste oil, trans fluid and coolant in and envirowaste who do my pumpouts told me its fine to add coolant to the tank and they pay me 5 cents per litre for the privilege.

Last time I had a visit from the EPA at the workshop (8 years ago) they told me the same thing.
 

Tony66_au

New Member
Messages
2,306
Points
0
Location
Gippsland, Vic
Just looked it up and this document covers it.

LINK

the specific section says
Radiator fluid coolants often contain ethylene glycol
and corrosion inhibitors. With a trade waste agreement
with the local water authority, these liquids can be
discharged to sewer. Otherwise they must be collected
and disposed of as PI
 
OP
Oversize

Oversize

Grand Master
Messages
5,751
Points
596
Location
Melbourne
This is another thread that I created a long time ago re flushing coolant
 
OP
Oversize

Oversize

Grand Master
Messages
5,751
Points
596
Location
Melbourne
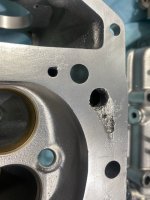
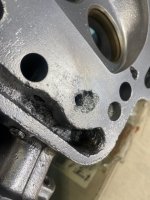
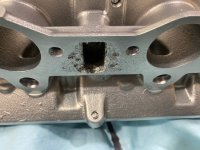
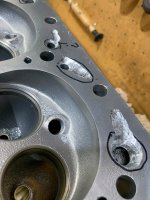
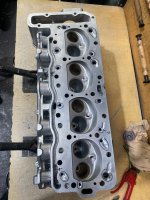
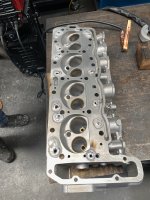
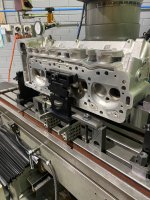
And this is why you should flush and change your coolant every 2-5 years! 6.9 head, luckily not too far gone, repaired and straightened, yet to be decked (not mine). Not for the feint hearted....

55915F20-0538-4F50-8153-648501B55326.jpeg6D505028-8DC2-4510-83CB-AC392438698E.jpegFF5EE610-439E-4B3C-BA5D-2D75CA48B084.jpeg591E03CC-90FC-4A86-9E75-3696DE95F06B.jpeg8DDC5B52-2891-4614-84C8-08B39EBCC44A.jpeg45CAF754-C6EE-4BD0-91B8-B09FF25497EA.jpeg1EB1A6DB-3EA3-4495-8FE9-9207F8A258EC.jpeg
 
OP
Oversize

Oversize

Grand Master
Messages
5,751
Points
596
Location
Melbourne
This applies to all cars with alloy parts. More important when those parts make up large, rare or expensive components of an engine. Unfortunately the vast majority of our cars have gone through periods of low value & maintenance suffered as a result.

My advise is to not wait another day to get it done! As Patrick said it’s not hard, or expensive. Just a bit messy...
 

Patrick_R

Grand Master
Messages
2,643
Points
445
Location
Claremont Meadows
You’re spot on Mark.
Plus other basic maintenance items are also neglected to the point of failure.
It seems way past most modern people’s interest to even think of these things.
Cars now to the modern family are simply a disposable appliance these days.
 
OP
Oversize

Oversize

Grand Master
Messages
5,751
Points
596
Location
Melbourne
I’ve just finished 2 lengthy articles on this topic & related subjects for MBCV’s ATB magazine. I might start a new topic with all the text & add pix
 
OP
Oversize

Oversize

Grand Master
Messages
5,751
Points
596
Location
Melbourne
Here's the latest article in ATB Magazine distributed by MBCV:

I begin with a question; what is the THE MOST IMPORTANT FLUID that is critical to ensure the long life of our precious vehicles?? Brake fluid? No – this ensures we are safe and even if it deteriorates these smaller parts can easily be repaired / replaced. Engine oil? No – in a vehicle not driven daily it takes many, many years for engine oil to break down to a point where it can affect expensive components and longevity. The correct answer is an often neglected fluid called COOLANT.


I’m sad to report that both myself and a friend on the other side of the country in WA have experienced some rather negative outcomes regarding coolant and laid up vehicles. Even worse ,they both involved M100 powered vehicles. These cars were neglected by their previous owners but this applies to all vehicles incorporating alloy engine parts.


My old man once had a theory that if you don’t add coolant (just water when necessary), the engine is less likely to develop a leak! He’d only fix things when they invariably broke down, so I have several childhood memories of being stranded overnight in a dead car and miles from help! You might get away with it for a while in an old Ford or Holden but it’s definitely not a wise practice to adopt for a Mercedes Benz with tighter tolerances and a delicate mix of exotic materials!


Back in the late 80s service requirements dictated that coolant should be changed every 2 years. Today we have long life coolant (>5 years) which is likely to make owners more complacent, since it’s so long between changes. Extending the service life of some items can save some time and money in the long run, but it does make undertaking the task when due even more important. Missing this aspect of a major service could mean the coolant isn’t changed for 10 long years and that’s when huge problems can begin to surface. And here’s just a few examples:


My friend from WA bought a very sad W109 6.3 which would scare the living daylights out of anyone else but him, since he’s extremely capable of completing almost any major repair himself and to a very high standard. The car needed attention in all areas and he started with the huge task of removing the cylinder heads to investigate why the engine was seized, particularly since there was evidence of coolant in the cylinders. The coolant had completely degraded and turned to acid, thereby dissolving many critical areas, all the way through to the combustion chamber in at least one cylinder!


Not quite as extreme, but equally horrifying was my more recent experience with a 6.9. I purchased the vehicle from QLD and it was pretty neglected from a mechanical point of view. I had the impression that the owner left the maintenance up to his mechanic who was taking shortcuts and rendering the vehicle unsafe. About 6 months after taking delivery and retrieving it from paid storage in North Melbourne, I started to re-establish a maintenance schedule and assessment. I was pondering how to tackle changing the coolant and dealing with the resultant mess in the garage, when my relationship broke down and I had to move everything. Perhaps 12 months later, after a wash I popped the hood to have a quick look and noticed some white deposits around one of the alloy housings at the top and front of the engine. I thought to myself that doesn’t look great, but I’ll get to it later. And I did; around 5 years later!! Strange that I used to take pride in the process of changing brake fluid and coolant exactly when required, but perhaps I became exhausted at the mere thought of doing the tasks….


Thinking I’d just resume changing the coolant, I couldn’t remember if I’d partially drained the coolant (since the level was quite low), or if I’d touched it at all…. Something in my head said I should top it up and pressure test the system. It seemed to hold pressure ok, but there was water leaking from the top of the engine, towards the back. I thought that was an odd location and started poking around the spot with a screwdriver, when it effectively exploded in my face! I’d discovered there was a hole in the top of the inlet manifold and straight into the water jacket. I totally panicked thinking I had a dead engine and it was all my fault. If it had eaten through into the intake runners, I was in big trouble. I set to work and removed the manifold to discover the damage was isolated to the manifold and no other critical areas. I was fortunate to have another 6.9 from which I could source a replacement manifold; it always pays to have spares if you own a rare vehicle….


I tried to analyze how the corrosion could’ve developed in this way, since it seemed to be in an area that was actually above the coolant level. I’d removed the air filter assembly years before when I first started working on the car and couldn’t recall seeing evidence of corrosion, or an imminent failure. So it seems the corrosion occurred rapidly during my ownership. This would indicate that coolant can degrade at an alarming rate when it’s passed its use by date and suddenly begin to wreak havoc on the engine it was designed to protect.


I can’t remember where I sourced the photographs, but another person discovered corrosion in a set of M100 cylinder heads and spent a considerable about of money on labor to reverse the neglect. Understandable since I once priced a M100 cylinder head (when they were still available) and at $11,000ea I’d also repair the old ones! Of course water pumps can also be very expensive (if they are still available) and newer engines are almost entirely made from aluminum alloys including materials like ‘Alusil’, which makes it clear that coolant condition is of utmost importance. Signs of trouble include crystallized white coloured deposits and bulging hoses around hose clamps. Coolant in good condition tends to have a cleaning effect and will find the weakest link, so a minor leak makes itself known quickly.


Armed with the knowledge of at least three horror stories, you should know there’s a cure available: CHANGE YOUR COOLANT NOW if you’re not 100% sure when it was last done and done PROPERLY!! Coolant can be tested via its specific gravity with a special device, similar to testing the cells in a wet cell battery. However, I wouldn’t rely solely on this test or just add concentrated coolant if you discover it’s diluted. Follow the manufacturer’s maintenance schedule, do the job properly and relax for the next few years!


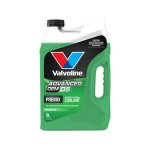
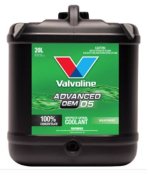
Look for genuine MB concentrate, OEM, or Valvoline Zerex G05 (for Mercedes Benz vehicles pre 2017). **Note Zerex had now been replaced with Valvoline Advanced OEM05**. Strangely, a Valvoline premix is available at Bunnings and Big W (more on premix a bit later)! Early MB and OEM coolant was a light yellow colour, but was updated to blue. The Valvoline coolant described above is green. At one point Totota coolant was red! Note that different coolant types must not be mixed together. If you decide to swap the coolant you’ve been using, or it is unknown what type is in your cooling system, then a full flush is required.


You can either buy a concentrate that you must mix up yourself (much like cordial), or buy a premix. Personally I recommend the concentrate. Check your owner’s manual, or on the web for your cooling system capacity. Make sure you buy a bit more than necessary, just in case you spill some, or have to top up later. Concentrate should be mixed 50/50 with distilled water. I prefer to buy distilled water in 10-20L containers and would highly recommend ‘BE Products’, 14 Clarice Road, Box Hill South, Ph 9001 7661, M-F. Distilled water is purer and therefore superior to demineralised water, which can still contain biological matter. Many premixes use demineralised water (including Valvoline). When mixing your own concentrate/distilled water, pour a single bottle of concentrate into a clean 20L container (suitably labeled) and then fill that now empty bottle with distilled water. Pour the bottle of distilled water (previously concentrate) into the 20L container. Do this with each bottle of concentrate until you have sufficient DIY premix. Do not completely fill the 20L container, since you may be unable to add a full bottle of distilled water and the mix will be too concentrated. Follow my method and you’ll always end up with a 50/50 DIY premix.
 
OP
Oversize

Oversize

Grand Master
Messages
5,751
Points
596
Location
Melbourne
So here's a process I've developed to change your coolant, which can be adapted to almost any vehicle. Follow this procedure on a COLD engine:


  • Place the vehicle on jack stands so it’s relatively level,
  • Remove the radiator cap,
  • Place a 15-20L container under the bottom radiator hose,
  • Loosen the top and bottom radiator hose clamps at the radiator,
  • Rotate slightly and pull the bottom hose from the radiator (stay clear of the draining coolant),
Note: Using only the drain plug on the radiator (if fitted) is not sufficient since it does not provide the water flow required for an effective flush.

  • Disconnect the top hose at the radiator in a similar way to the bottom hose,
  • Disconnect the heater hose at the heater tap (usually located at the back and top of the engine),
Note: Disconnecting both heater hoses is ideal, however access issues can make this too difficult or ineffective. Generally MB heater taps are open when the engine is off and there is no need to remove the thermostat using my method.

Remove the coolant drain plugs from the block (if fitted) and drain the old coolant into the waste container,

Note: If the drain plugs have never been touched, then it may be wise to leave this step until next time. They may be corroded into place and attempting to loosen them now could lead to drain plug damage where the only fix is engine removal!

  • Remove the waste container from under the car,
  • Put a large container (or several) under the radiator, expansion tank and back of the engine; otherwise you’re about to make a huge mess!
Note: I once cut down a 1000L plastic water tank for this purpose, but it did become rather hard to move when it was full of water! Don’t even bother trying an inflatable children’s wading pool; it won’t last long when you drag it across the garage floor!

  • Fit a high flow nozzle to a garden hose,
  • Blast mains pressure water into the radiator expansion tank, radiator top neck and heater hoses (in both directions) until the water comes out clean,
  • Reconnect the bottom radiator hose without tightening the clamp, just enough to hold water,
Note: if you push the hose on too far, you’ll be making the job more difficult since you’ll be removing and refitting it several times during this process.

  • Refit the block drain plugs only enough to stop water escaping,
  • Rapidly fill the cooling system with water via the expansion tank until water runs out the radiator top neck or heater hoses,
  • Disconnect the bottom hose and allow the water to rush out quickly (the large volume of water rushing out will eventually clean the insides nicely),
  • Repeat the process of refilling and draining as many times as necessary until the water comes out clean,
  • Alternate filling the system between the expansion tank, heater hoses and radiator top neck until clean water is consistently coming out the bottom hose,
Note: Compressed air can be introduced to the water flow (with care) if water pressure in your area is relatively low and your cooling system is in poor condition where mild blockages have been identified.

Direct the water in both directions; through the disconnected heater hose and through the heater tap,

Note: If you’ve managed to disconnect both heater hoses, then you can flush the heater core in both directions and also through the engine and out the bottom hose on both sides.

Continue flushing in both directions (where possible) until all debris is flushed out & only fresh water is visible.

Note: If you find there’s no water coming out from an area you’re trying to flush, you can block water leakage elsewhere with your hands (or other means) to force a backflow, or to increase the pressure where necessary. If there’s no flow no matter how hard you try, you may have a serious blockage which requires the removal of various components to rectify.

Remove the block drain plugs,

Note: Clean the threads with a wire wheel as necessary and replace them if badly corroded.

If you’re confident you can do so without damage, carefully use compressed air to blow out any remaining fresh water from the heater core,

Note: Not doing this step will mean the new coolant will be slightly diluted.

  • Refit the block drain plugs with new washers (do not over-tighten them),
  • Replace rubber hoses where necessary (unusually soft/hard, or damaged),
  • Replace all the hose clamps with ‘Wurth’ brand ‘Zebra’ type or similar design,
Note: Good quality hose clamps won't damage the hoses and will allow the clamp/hose to be removed and refitted many times if necessary in the future. I would definitely NOT recommend using any hose clamp with slots cut from the band, which will bite into the hose and affect its integrity.

  • Position the hose clamps for easy access and reconnect all the hoses,
  • Tighten the hose clamps using a Wurth hose clamp tool or 7mm socket on a 1/4” drive,
  • Decant some of your commercial or DIY premix into a 2L container (not a drink container) and using a funnel, refill the cooling system to a level half-way between minimum and maximum on the expansion tank,
  • Start the engine with the radiator cap removed, heater on hot and the heater fan on low,
  • Monitor the coolant level and top up when necessary using your premix,
  • Position the car on an exaggerated (but safe) incline with the radiator expansion tank as the highest point in the cooling system,
  • Continue to run the engine and monitor the coolant level until the engine reaches normal operating temperature,
  • Refit the radiator cap,
  • Test drive a short distance, while keeping an eye on the engine temperature,
  • Let the engine cool overnight and recheck the coolant level,
  • Relax for 2-5 years!!!


As you can see it’s an involved process if it’s to be done correctly. You can see why I was exhausted just thinking about it and I ended up doing this 4 times just before leaving the factory! It’s well worth paying an expert to do all this if you don’t feel confident to DIY!


You can complete an even more thorough flush using citric acid. This additional work may only be necessary if your cooling system is heavily contaminated with debris, rust or oil (heaven forbid). I have yet to try this process, so I cannot state if it’s worth the effort, effective, or even safe for you, your engine, or the environment.


So how can you dispose of the old coolant?? Not an easy answer so I’ve discovered… Coolant generally contains ethylene glycol which has anti freeze, anti boil and corrosion inhibitors. It is a poison, so it must be kept away from children and animals - DO NOT DRINK!! Unfortunately it has a sweet smell and taste which makes it even more dangerous. Some manufacturers are now using bittering agents or propylene glycol which is apparently not as toxic to animals/humans. Used and degraded coolant is even worse than new coolant since it may contain heavy metals such as lead and chromium and can become acidic under certain conditions. Do not store new or used coolant in drinking containers and make sure the containers used are clearly labeled and kept out of reach by little hands.


Some say you can discard coolant into the sewerage via the laundry trough, or directly into the sewer access opening in the back yard. This means it heads to the sewage treatment plant, instead of into the storm water, creeks, rivers and eventually untreated into the ocean... Definitely NOT the storm water drains or onto the ground. If it gets into ground water then it’s not good for the environment. Waste water used during the flushing process might be ok to discard on the lawn, but keep it away from fruit trees, vegetables, herbs and plants used for consumption.


Of course not everything you read on the web is true, however other properties of coolant I’ve discovered on the web include:


  • It will completely dissolve in water,
  • Has a low to moderate toxicity to aquatic life,
  • Ethylene glycol breaks down in air from 1.5 - 10 days and in water or soil in several days to a few weeks,
  • It is a common de-icing agent for airport runways (which runs off into storm water drains).


I’ve been told discarding coolant with waste oil (sump/engine/transmission/cooking oil) will contaminate the lot and it makes it unsuitable for recycling, but others say it’s ok depending upon the collection agency!


After additional research, the best I can recommend is to keep it separate, clearly label it and check out this website for a household waste collection near you. Search for the link, ‘Detox YourHome’:


www.sustainability.vic.gov.au


Note that the site specifically states they can collect waste coolant/antifreeze. Unfortunately individual collections are not very frequent, so you may have to store it for a while, or travel a greater distance if you wish to dispose of it quickly.
 
OP
Oversize

Oversize

Grand Master
Messages
5,751
Points
596
Location
Melbourne
Valvoline has discontinued Zerex & replaced it with the following product:

IMG_5301.jpegIMG_5302.jpeg
 
OP
Oversize

Oversize

Grand Master
Messages
5,751
Points
596
Location
Melbourne
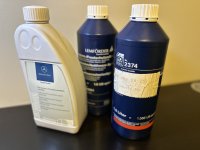
A few other options but not sure if any are NLA

IMG_6165.jpeg
 

sean sherry

Master
Messages
2,005
Points
189
Location
sydney
Here's the method I've developed to change coolant. It can be adapted to almost any car:

1. Jack up the car (don't forget to drive it on some small timber ramps first, so the trolley jack will fit),
2. Put safely on axle stands,
3. Have a big floor squeegee on hand,
4. Put a large container (or several) under the radiator, expansion tank and back of the engine (otherwise you’re about to make a huge mess!). I intend to cut down a 1000L plastic water tank so it forms a small pool. I've used a kid's wading pool in the past, but it won’t last long if you drag it across the concrete when it's full of water!
5. Remove the radiator cap off (cold only),
6. Drain the radiator via the bottom hose,
7. Disconnect the top hose at the radiator,
8. Disconnect both heater hoses at the back of the engine,
9. Remove the coolant drain plugs from the block (I've never tried on a 6.9L),
10. Remove the containers from under the car,
11. Discard the old coolant into the sewerage (not the storm water),
12. Reposition the containers back under the car,
13. Fit a trigger nozzle to a garden hose,
14. Blast mains pressure water into the expansion tank, radiator top neck and heater hoses until it comes out clean,
15. Alternate between directions through the heater core,
16. Reconnect the bottom hose without the clamp, just enough to hold water (if you push it on too far, it's too hard to remove/refit several times),
17. Refit the block drain plugs only enough to stop water escaping,
18. Rapidly fill the system with water through expansion tank until it runs out the heater hoses and the top neck of the radiator clean,
19. Drop the bottom hose and allow the water to rush out quickly (the large volume of water rushing out will eventually clean the insides nicely),
20. Repeat refill and drain as many times as necessary until the water comes out clean (alternate filling between the expansion tank, heater hoses and radiator top neck),
21. Remove all the full containers from under the car and empty on the lawn,
22. Replace the block drain plugs if badly corroded (clean the threads with a wire wheel if they're just dirty, but still usable),
23. Refit the block drain plugs with new washers (do not over-tighten them),
24. Replace hoses where necessary,
25. Replace all the hose clamps with Wurth Zebras (which won't badly bite into the hoses and cause them to burst when it’s inconvenient),
26. Reconnect all the hoses,
27. Mix 50% distilled water & 50% MB or OEM coolant (don't use generic stuff) into a clean 20L container,
28. Decant some of the coolant mix into a 2L container and using a funnel refill the cooling system to a level half-way between minimum and maximum,
29. Remove the stands and drop the wheels onto the timber ramps,
30. Remove (hopefully) your trolley jack,
31. Drive off the ramps,
32. Drive back onto the RHF ramp only (this will keep the expansion tank as the highest point in the system),
33. Run the engine with the heater on and the radiator cap removed until hot (to remove all air pockets),
34. Refit the radiator cap,
35. Drive off ramp,
36. Test drive a short distance, while keeping an eye on the temperature,
37. Drink beer (or spirits)!!! :D

You can get away with only disconnecting one heater hose, if you know what you're doing. On a 6.9, you may be lucky to disconnect them at all, due to accessibility problems! However the flush won't be as thorough if you don't disconnect at least one.

This could take half the day, but you won't have the do it for 2 years! In fact, I've heard the coolant can last up to 5 years if mixed with the correct concentration of distilled water.... Job done!!! :D
Nice!

The large Bungs for cooling system orifices are usually $20 or so dollars at Repco or similar and often come with a click on hose fitting if you want tu use it, I also used to drill and tap a small bolt hole in the top of thermostat housings or the highest point in the water jacket to bleed off any air without having to rely on the engine running and I suspect that on an M117 is would be near the AAV location.
 

Similar threads

Top