GOLD 6.9

More threads by Styria

Styria

The Godfather
Moderator
Messages
9,391
Points
622
Location
Sydney
Some members may be aware of the services available from our Barbecue man Jerry operating under the auspices of Michel, the Prince of Arabia, at the premises located in No. 2, Ash Road, Preston. Jerry has been looking after a number of various members' paint and repair requirements for some sixteen years, and mostly his work has been right up to scratch. My 6.9 Gleaming Beauty was painted some ten years ago - well, it was more than just painting, and his work has stood the test of time with an admirable gloss still being very much in evidence.

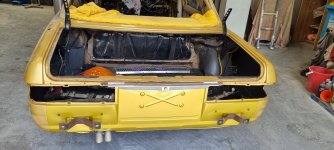
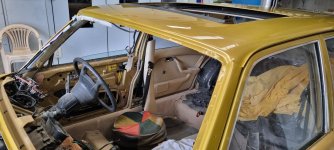
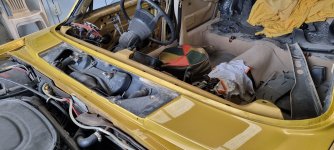
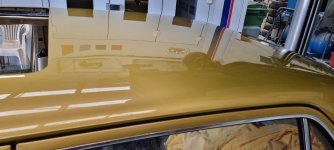
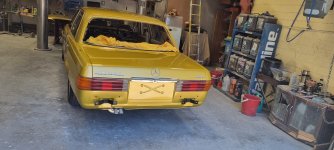
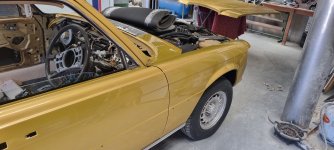
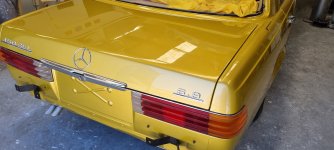
To take matters even further, the Spray Booth that's been in splendid use ever since I have known Michel, has now undergone a huge renovation and quality update process just recently at considerable cost, but it simply is now state of the art. I was fortunate in having the owner of the Gold 6.9 entrust Jerry with a complete respray of the car, and I can safely testify to the splendid quality of the job carried out by Jerry. I am taking the liberty of posting some pictures that amply illustrate the quality of the work.
 

Attachments

  • 20240109_131454.jpg
    20240109_131454.jpg
    6.9 MB · Views: 7
  • 20240115_122625.jpg
    20240115_122625.jpg
    6.3 MB · Views: 7
  • 20240115_122635.jpg
    20240115_122635.jpg
    7.7 MB · Views: 7
  • 20240115_122652.jpg
    20240115_122652.jpg
    7.2 MB · Views: 7
  • 20240119_124423.jpg
    20240119_124423.jpg
    7.4 MB · Views: 6
  • 20240119_124534.jpg
    20240119_124534.jpg
    7.6 MB · Views: 5
  • 20240119_124602.jpg
    20240119_124602.jpg
    7.7 MB · Views: 5
  • 20240119_124707.jpg
    20240119_124707.jpg
    7.6 MB · Views: 7
OP
Styria

Styria

The Godfather
Moderator
Messages
9,391
Points
622
Location
Sydney
Yes, I concur with your thoughts. When I first laid eyes on the completed respray, it was a bit like "hitting me in the eye". The colour mixed was to the Manufacturer's specification, but possibly the paint supplied may not necessarily be identical to the original shade. I have a sneaking suspicion that a PPG or Standox, or Glasurit may well be a slightly different shade, but one will never know until one would see a side by side comparison - however, I am confident that the owner will be delighted with the quality of work.
 
OP
Styria

Styria

The Godfather
Moderator
Messages
9,391
Points
622
Location
Sydney
As part of the overall restoration tasks on this car, the owner wanted to install a rebuilt dash, refurbished timber fittings for dashtop and gearbox console plus, of course, new body rubbers all round, carpets etc. - in other words the whole gambit of upholstery and refurbishment work. One aspect of the job relates to the dismantling and refitting of the switch panel containing the two rotary dials and a number of other electric functions pertaining to the operation of the Air Conditioning and Heater/Fresh Air Controls.
Whilst I have been familiar with this part of the Interior work for many years, refitting is always fraught with a certain amount of difficulty and untold frustration.. For instance, installation of the Radio. I believe that, when new in the '70s, the cost of the Radio/Tape unit was probably close to the $600 to $800 mark, and I am convinced that the major portion of this cost must have related to the installation of the unit. For starters, the Becker Mexico Deck weighs 2.3 kgs. (honest) and it fits straight in without the support of a cradle. You need to shove aside, big time and with force, thick and stiff wiring looms (almost impossible) and furthermore, the upper section is retained by a very flimsy plastic bar located below the two main dials. In all of my time with work in this part of the console, that plastic bar is partially broken and just about impossible to repair properly. Sure, when new, it would have been strong enough to support all components, but some forty years later - good luck finding an unbroken one. Just some pictures for illustrative purposes.20240321_172205.jpg20240321_172211.jpg20240321_172216.jpg20240409_135613.jpg20240416_162232.jpg20240416_162302.jpg20240416_162302.jpg20240416_162317.jpg20240416_162308.jpg
 
OP
Styria

Styria

The Godfather
Moderator
Messages
9,391
Points
622
Location
Sydney
Just some explanations. The "plastic bar" I am referring to can clearly be seen just above the Tape Deck. It is the unit that invariably is partially broken, if not completely. Furthermore, there is a strange looking metal bracket (like two spikes?) that is riveted to the aforementioned plastic bar that is required to hold and locate the bottom Air Conditioning Control dial which, in turn, incorporates an impossibly thick and stiff cable to leads to a flap located behind the glove box. That's just the start of it. At the back of that dial, there is a totally unwieldy wiring loom incorporation either eight , or ten pins (I am too tired to count them) attached to the back of that dial. There is also another part of this overall arrangement. The top dial - I am hoping to incorporate some illustrations a bit later - that has also a twin connector wiring loom attached to the back, together with three vacuum lines, and that particular dial is free floating - in other words, its secure location depends on the timber switch panel. Once again, illustrations to follow. In the meantime, just peruse the photos submitted so far. Regards, Styria.
 
OP
Styria

Styria

The Godfather
Moderator
Messages
9,391
Points
622
Location
Sydney
In case anyone questions the fitment of part of the Instrument Panel - as it is, I can actually start the car (if need to) and also operate most of the Electrical items in the car, such as lights, sunroof etc. etc. Regards Styria
 
OP
Styria

Styria

The Godfather
Moderator
Messages
9,391
Points
622
Location
Sydney
Again, pictures to follow. However, I need to correct some inaccuracies. The bottom dial is actually located by the "spike" arrangement and it activates the Air Conditioning controls. Fitting wise, it is fairly trouble free. It is the top dial that's free floating, with an impossibly stiff cable opening and closing the vent behind the glove box, whilst a SO AND SO thick and unyielding wiring loom with the 8 (10) pin connector facing away from the back of the dial and it has absolutely no give in it. Frustrating to the eye balls. Regards Styria20211130_163610.jpg20211130_174834.jpg20211130_174834.jpg20211130_174841.jpg
 
Last edited:
OP
Styria

Styria

The Godfather
Moderator
Messages
9,391
Points
622
Location
Sydney
With digital imaging being so useful and flexible nowadays, you would think that it would be easy to re-install the various components that one needs to remove and re-assemble in due course. However, I find it quite difficult at times to remember the exact procedure and even looking at photographs take, one could easily become confused and uncertain, especially when dealing with difficult installations. From hereon in, I will make sure that I will keep accurate notes to refer to in conjunction with photos taken. That's been driven home to me by under bonnet work on my son's Rover 3500S, and also the 6.9 in question now. Regards Styria
 

Similar threads

Top