Disco Panzer

More threads by ProfessorExperimental

OP
ProfessorExperimental
Messages
125
Points
81
Location
Sydney
The R in WR8DC stands for, you guessed it, resistor.
You need W8DC.
I may have a set I can spare, I'll check tomorrow
They're WR8DC+, which NGK says cross references with BP5ES (no R), vs WR8DC=BPR5ES, so I assume the + signifies "added lack of resistance" 🤣

I'd say the plugs I have are the right ones now, since I have the (correct dizzy terminal now) Eagle leads on order. Depends on the actual impedance of the yttrium plugs I guess, but is gud Russian wr8dc+ in car now as far as I remember and I assume it ran until it didn't. I'm not expecting to stick with any of the leads/plugs long term IF the engine works. I just need to get it up the hill without wasting too much cash or time getting the right parts right now.
 
OP
ProfessorExperimental
Messages
125
Points
81
Location
Sydney
Yup. That's all I'm after at the moment. I'll spend and wait for a new set of Beru leads and BP5ES when it's time, and the cheap bits can revert to diagnostic spares.
 

Michel

The Prince of Arabia
Moderator
Messages
10,023
Points
775
Location
Sydney, Australia
If you're looking for one used one, give MB Classic in Greenacre a call. Its the sort of thing they would have and I doubt it would be very expensive.
Or ask the Godfather (Styria), he has just supplied me with a good set for my 6.9.
 
OP
ProfessorExperimental
Messages
125
Points
81
Location
Sydney
If you're looking for one used one, give MB Classic in Greenacre a call. Its the sort of thing they would have and I doubt it would be very expensive.
Good tip. Thanks. Got a 1kR one which should do the job fine. It was definitely not very expensive ;)
 
OP
ProfessorExperimental
Messages
125
Points
81
Location
Sydney
Decided to hoe into the car today during a dry spell. Really just intended to round out ignition testing by pulling off the dizzy cap and rotor and checking resistances (even though they're both so heavily eroded i definitely need new ones).
20231202_140345.jpg

Didn't even end up getting the multimeter on them though. The sun came out proper and I sort of thought "Y'know what? I realy should just pull those valve covers off and convince myself theyre all there, not too bent, move when the engine rotates etc. and check the chain guides and so on while i'm at it before I go any further..."

I demonstrated what a "youngster" (not in age maybe but in experience) I am yet again. Really didn't expect it to be so easy. I'm used to 90s and onwards Japanese EFI stuff, with a bit more 2000s BMW mixed in lately. Valve cover removal on my recent purchase to replace the written off daily was a 3 day affair. 4 lightly torqued M6 bolts per bank and gently squeezing past a few fuel hoses was *a lot* easier than I was expecting. I see these engines were designed for tappet adjustment and a pleasant working experience for colleagues in the workshop. Wow. What a different age...
20231202_142044.jpg
20231202_150250.jpg
Inside there was quite some burnt oil buildup. I'm fairly sure there's supposed to be an air path to the breather hose at the back of the right one, correct? I'm still a bit in awe of how light they were for such deep castings. Chapeau, '70s Mercedes, chapeau.

20231202_142051.jpg
You can see how much gunk there was inside by what stayed on the spraybar and dropped onto the #8 cam lobe while I pulled the cover off :/

20231202_142130.jpg20231202_142142.jpg
Guides looked pretty dark to me, though hard to say with so much carbon on the more exposed parts. At least they aren't crumbly or even obviously worn looking. Added to the mental todo list for Motor Out.

20231202_142337.jpg
I noted quite some grime build up in the head/in bolt heads. I need to look up where the drain holes on the m116 are, I certainly couldn't find any! :unsure:

20231202_142313.jpg
Some of the rockers looked fine, others were quite badly worn...
20231202_143201.jpg
...not quite sure why...
20231202_143207.jpg
...this all looks very normal, right?

Anyway I wanted to check chain/cam alignment, and the lobes were all dry (even the ones that looked like they had been getting oil while running/cranking), so I added slippery by pilfering the lathe cabinet:
20231202_143012.jpg
Its way oil. I supposed that would do the best job. The appropriately-vintage dispenser is just a bonus conceit... (my lathe is about 82 years old)
Anyway. This is all just a round about way of coming to terms with needing either new cams and about 5 rockers, possibly 2 lash adjusters (the 2 on the really badly worn lobes are finger loose and let the rockers rattle, but then, they would, wouldn't they?), or a regrind and all the rockers & HLAs to be sure. More todo. or new engine... hmmm...

20231202_143220.jpg
In any case quite a shame since they were the much-vaunted "GTS 55" cams. Now I have another reason to be disappointed that guy on eBay is no longer selling his "genuine" replica AMG spoiler.... Those 3 little letters could have been mine!

Anyway. Chain has at least been replaced once (in only 64000 miles! :eek:...). At what-i-assume-but-havent-confirmed-to-be TDC on #1 (given the risk of parallax error I treat it as " if i were stood here pointing a timing light between the dizzy and the water pump, where would i see the mark wrt the pointer?"), bank 2 is aligned (no real surprise), but bank 1 is about half a tooth retarded. So around 9 crank degrees. Not great but not too bad, certainly shouldn't prevent it starting, right?

20231202_151804.jpg
...but I'm pretty sure this would! :ROFLMAO:
To elaborate: this is still at (or within 2 deg of) TDC. You can see where the dizzy clamp nut USED TO sit...
20231202_151810.jpg
...and if I push the centrifugal advance around you can see it gets nearly 2/3 of the way to the next trigger. And a crossplane v8 fires every 90 crank degrees so if i read the timing sticker right that advance should be 30 degrees, making the current timing, without vacuum advance or retard, about 30 deg BTDC at idle. Not even my Rx7 can handle that.

20231202_150912.jpg
Sanity check here: my timing sticker. I read it as 30deg advance @ 3000rpm, no vacuum. TDC +- 3deg @700-750rpm idle (and 0.5-1.5% CO), no vacuum. Right?

Anyway the bloody dizzy clamp nut was loose enough to move putting a spanner on it, so the dizzy was just hard against the stop full advanced.
Can probably forget about the multimeter now 🤦‍♀️
 
Last edited:
OP
ProfessorExperimental
Messages
125
Points
81
Location
Sydney
Applied measurement and a little critical thinking to bits I took off yesterday.

20231203_125355.jpg
This cap hasn't always been fitted correctly... :rolleyes:

20231203_125513.jpg
This centre contact is coated in some kinda graphite-meets-WD40 varnish that isn't the most conductive...
20231203_125655.jpg
Captain File to the rescue, again, much better now.

20231203_125951.jpg
This is... presumably not to spec...

20231203_130201.jpg
Not the problem...

20231203_130221.jpg
No obvious arcing/crap buildup (in contrast to the plug contacts!)...

Summary of findings:
20231203_130642.jpg

20231203_130810.jpg20231203_130806.jpg20231203_130808.jpg20231203_130812.jpg20231203_130815.jpg20231203_130820.jpg20231203_130823.jpg
20231203_130909.jpg
Dahn dahn daaaaaahhhhhhhnnnnn! I bet those cracks are where the magic came out, and there's a nicely melted blob of carbon stuck to the end of the screw terminal above a crusty void in the potting compound. I may yet chuck the cap in the lathe and try to gently bore out the compound and repair (the plastic part of the post seems intact). Should this one also be ~1kR?

Still pondering the camshaft issue...
 
Last edited:

c107

and 111/116/124/126
Moderator
Messages
3,529
Points
760
Location
Sydney
Some of those cam lobes look pretty bad. Sometimes cams in these engines can be oil starved as the oiling tube fittings (plastic) come lose over time letting the lobes past where it comes off starve for oil.
 
OP
ProfessorExperimental
Messages
125
Points
81
Location
Sydney
Yeah I'm still weighing up what to do. The muntered lobes coincide with lash adjusters that were out of the head part of a turn. Of course the whole picture is of a grotesquely underserviced engine, so although the left bank seems largely fine (some lobes in my first picture of covers off even look almost new), there are quite likely other disasters lurking.

Did the oil feed clog in the spraybar at the cam bearing before the stuffed lobes? Probably not, since the exhaust lobe on cylinder 1 looks ok and I believe the feed is from rear to front. Are those two spraybar holes clogged? Easily likely. Are those two lash adjusters blocked, causing them to back out under oil pressure (my impression from the two holes in their seats visible on a youtube video of valve removal in a 117 is that they're supplied from the bottom, and vent at the top of their thread just below the flange on the "nut")? Seems plausible. They would certainly drop the oil pressure available downstream and upstream by letting oil bypass them out their threads, but again, downstream and upstream lobes are ~fine.

What I haven't checked is "does the valve actually move", because a bent valve that has been forced back up into the head by piston contact would certainly resist being pushed back down by the cam lobe, oiled or not, and this resistance (and possible back-and-forth with the piston) would certainly hammer the lash adjuster, right? In a way like an impact drill... with oil pressure pushing up constantly...

OK that hypothesis has the hole that if I have what looks like about 9 degrees (ish) of chain stretch, and otherwise everything turns, why do I suspect bent valve?

Hmmm...

Trying very hard not to come yo the conclusion that the only logical course of action is to buy the 5.0 m117 with the nifty manifolds
 

c107

and 111/116/124/126
Moderator
Messages
3,529
Points
760
Location
Sydney
Yeah unfortunately seems a neglected engine and probably has a lot more than 64,000mi on it. these Iron block v8s are pretty indestructible, so it takes a lot of abuse to kill one. I've seen a few 450s (same thing, just taller block) for sale with over 1,000,000 on the clock.
 
OP
ProfessorExperimental
Messages
125
Points
81
Location
Sydney
Well mine seems dead. Timing set correctly, confirmed the dizzy cap actually does work. New plugs, new leads. Confirmed sparking. Cranked till oil pressure. Sprayed aerostart into the flapper to circumvent any fuel metering issues. Got one cough straight off, then nothing BUT...

Smoke now puffs out the oil breather when cranking (it didn't before). Conclusion: something's trying to fire but rings are stuffed or worse, holey piston.

Then my time ran out. Offers considered 🥲
 

Attachments

  • 20231205_155210.jpg
    20231205_155210.jpg
    7 MB · Views: 2
  • 20231205_140540.jpg
    20231205_140540.jpg
    7.3 MB · Views: 2
  • 20231205_140412.jpg
    20231205_140412.jpg
    946.2 KB · Views: 1
  • 20231205_122812.jpg
    20231205_122812.jpg
    834.3 KB · Views: 2
  • 20231205_122729.jpg
    20231205_122729.jpg
    1.1 MB · Views: 2
  • 20231205_122533.jpg
    20231205_122533.jpg
    1.8 MB · Views: 2
  • 20231205_121316.jpg
    20231205_121316.jpg
    1.7 MB · Views: 2
  • 20231205_120336.jpg
    20231205_120336.jpg
    1.8 MB · Views: 2
  • 20231205_114038.jpg
    20231205_114038.jpg
    2.3 MB · Views: 1
  • 20231205_112704.jpg
    20231205_112704.jpg
    2.3 MB · Views: 1
  • 20231205_113212.jpg
    20231205_113212.jpg
    827.1 KB · Views: 1
  • 20231205_084656.jpg
    20231205_084656.jpg
    1.5 MB · Views: 2
OP
ProfessorExperimental
Messages
125
Points
81
Location
Sydney
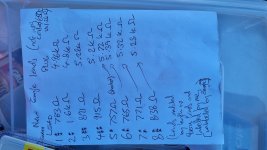
Engine dimensions scratchpad (my own reference, might as well keep it here).

Iron 116 92x65.8
Alloy 117 96.5, 98.5/99 practical bore limit

116 CR 138+--.05 CH 43.15 *
117 154.5+-.05, 48.1
116.985 piston rings are 1.75 and 2.5 thick, with a 4mm oil ring. Compare je for na typical of aftermarket us v8s with 1 and 1.2 with 2.8 oil, or 1.2 and 1.5 in boosted applications.

All except alloy emission markets (AU, JP, US) BE 52, pin 26
Emission 48, 23
bah. journal sizes. rod BE bores are actually 55.6 and 51.6. Rod journals are 50mm wide, allow for 3mm fillet (2mm is acceptable).

Alloy CCccs:
7 56+-.5
6 45+-.5
Iron
7 45

Decks alu
6 216
7 245
*note if this is true 6 Iron block is 213 given tech data in manual, 32.9+138+43.15=214.05

Only 26 gudgeon I found was for a 1.9tdi
Nissan oilers up to 30

Most benziner 23 or less. Ls1 .945", m5x are 23 iirc, but s52 21. All Rb are 21. Honda b18 and k20 are 138,139 CR and 51 BE. 21 and 23 gudgeon resp. Rev limiter.

92 is ej20, 99.5 is ej25. BE 55 but gudgeon 23. Need only match gudgeon and CH. Rods are short tho.

Modular 4.6 2v 3.701" je 314572 -11.6cc 31CH 350g but offset pin
(If na 1,1.2 rings, pc 1.2, 1.5) rings from total seal, clips (#866-063-MW), pins #866-2250-15-51C (98g).
Also a 3.622" option 314664 but -30.5cc and 33.53 CH.
314571 is 3.622" 2v -9.3cc 1.2" CH 345g
2j matches BE with 5.590" CR eg SCAT SC2559020471020 mostly 1.02" wide
Looks like -8mm deck height with 572 so can go 7 Iron crank and mill 1.75 off the pistons. Bit much.
Gives 4.7L, ratio 1.67, 635(callies)+100+350=1085 total, 10.7:1.
callies rods have a 25mm pin end width for all sbc/ls/sbf
consider a 5.7" large journal (2.1") sbc rod with clevite CB-745p-40 (40 thou undersize) bearings should give 52.324mm plus clearance, or better an oversize small journal one if possible (2.04"=51.816 ~ halfway between new and 1st repair stage 6/7 crank spec... assume .002 clearance so actually 51.866...)-bah, no such thing. only 0.001 oversizes for extra oil clearance etc. 2.225"=56.515 is the standard 2.1 journal BE bore, so probs best off just using mercedes spec bearings and honing rods by 0.095mm diameter... LOL: callies list journal size, so supra rods are probably fine...

6/7 rod bearing is 22mm face, supra is 19mm, acl 4B2166H (ford/cosworth yb) is 20.xx and BE dimensions matches the supra. Remember: rod bearing to suit the rod (given a journal match).

Looks like iron/euro alloy crank+yb bearing+supra rod+modular 2v piston. Face the big ends down to 24.bla 6/7 width. Select piston to get compression height close as possible with crank/rod combo and possibly machine some rim off the bowl. Valve reliefs are probably fine untouched as modular has more lift. Can also use 1uz rods (144 vs 142 for supra). BE and tolerances should/seem to be the same. May be narrower. Yes they are, .907" vs 1.02". They're 146 long though...

Concerns
Piston speed. Original 6 design had short stroke to limit speed to 14.2m/s @6500
Coyote has 92.7 stroke and 7000rpm gives 21.63m/s so can probably go 7500 on 7 crank (21.25m/s) purely from a piston speed perspective... oil cav another matter... at least 6500 should be OK, from journal size too.
Journal widths. Supra aftermarket gudgeon is 1", BE 1.02". Modular is .94" all round but have also seen .965 PE. 7 is 22mm - bah,must be alloy (or wrong): 24.87 in 03-313! - 22 is the seat width - PE is 27.95. see journal dimensions above, modular would be fine. can also use chamfered bearings like Scat recommends for cranks with beefy fillets. They literally mount a stock bearing to a dummy rod and machine it on a mill.
Air. The big one. Need manifold mod. Stock port velocity is 280ft/s according to AutoCar article (38mm runner diameter used) - suggests 280/2.4=116(lol)x1.758"^2[APA]=204CFM max flow. Similar to generic yank donk at 7.62mm lift. Ideal is ~350ft/s for proper swirl, but how best to get there given any mods...
Balance. New crank. Could be halving moving mass... but include rockers! Bmw roller followers from n42?
Spring harmonics if recline increase.
Back cut valves or replace for mass red. Modular 2V are 44.5mm, stock 116 is 44mm
64mm main. Modular 67.xxx. 2j 62. Speed/main journal seems OK. Rods also come in 48/47.95 "honda" BE size to suit a chev 1663H bearing, might fit an emissions alloy crank? Better for revs eh. consider journal overlap for crank stiffness. ROT says .2" minimum. Makes 32mm the minimum rod journal size on a 7 crank... :ROFLMAO:... should be fine...
 
Last edited:
OP
ProfessorExperimental
Messages
125
Points
81
Location
Sydney
More calcs to do. But back of envelope says this is the way. Should be plenty of meat left after 2mm overbore, so block not an issue plus can go manual if desired, crank isn't externally balanced so dropping heaps of moving mass should mean only counterweights get lighter. Calcs req but ring flutter shouldn't be an issue until 8k+.

Need to increase depth in lower manifold though (at least Iron upper manifold is straighter than alloy) or just go full custom. 6 block has benefit of more bonnet clearance.

K jet delivery spec 1L/30s ~ 120gph = 750 lbs/h = 1500hp fuel cap. I think we'll be air limited by a huge margin...
 
Last edited:
OP
ProfessorExperimental
Messages
125
Points
81
Location
Sydney
Here is some info from the tech data book that may be helpful
Extremely so! Thanks very much! I may never actually have the cash or time to try any of these musings out, but the thought experiment is better than despair at my yard art, and who knows someone else may one day use this thread to "finally unlock the performance potential of the m116/7 platform" 🤣
 
OP
ProfessorExperimental
Messages
125
Points
81
Location
Sydney
20231212_104608.jpg
Oh. That's interesting.

Turns out the squealing I had ignored when testing fuel supply was the injectors spraying fuel down every open intake port. Even with the engine off. Found mention of this in the 928 kjet tuning pdf, nothing in the Benz literature. Mercedes only mentions the mixture adjustment screw in the context of idle mixture, while the porsche lads view it as a baseline afr setting: turn the screw until the injectors open and then just back a touch. Seems much more sensible to me (certainly more like carby tuning where you always need a baseline setting to start)

Tried to achieve this, but not hard: you start off at full lean (3mm Allen key turned full counter-clockwise, this tops the adjuster out in its bore, leaving the fuel distributor piston at its lowest setting [I'm writing this out here because the mercedes manual literally just says "turn left = leaner, turn right = richer, which in my opinion is too terse for this situation], for the lowest possible fuel supply. At this point I pulled the safety switch plug and it squealed like a not-very-red pig. So fuel distributor needs a rebuild.

Sure enough pulling the dipstick had about 6" above maximum of oily fuel (or fuely oil).

20231212_122318.jpg
And I was off with the label maker... Note I have the auxiliary air valve that a 78-model 116.985 should have, but no ports on the fuel distributor (haven't checked but the manifold one isn't connected either...). So somethings squiffy there...

20231212_133333.jpg
Got a rude shock when I started disconnecting injector lines. Thought I had one coming off the injector when in fact I was rounding the injector flats on the hold down plate. 1 and 6 were seized like that, couldn't get them loose even with dual spannering so I left them attached. I'm quite likely to pull the injectors and replace them before the fuel distributor goes back on anyway I guess.

20231212_134227.jpg
I did notice this. #7 might have too much milk in the mixture. Must check for cow on that side of the fuel distributor.

20231212_134602.jpg
Oh, that's more like it #5, chocolate milk is much better.

20231212_140040.jpg
Might need to take advice from some of the experts: exactly how much chocolate sprinkles do these cars require on the throttle plate?

There was actually a sizeable puddle of fuel un the lower manifold below this after I cleaned the gunk out. Not bad given it was by now about 3 hrs since I ran the pump...

20231212_141943.jpg
Finally extracted. Now to apply the hammer and disassemble...

20231212_151134.jpg
Noticed 117 part number on the bottom. Not sure if this is relevant to the squiffiness mentioned earlier or if it's just a shared part on later cars.

20231212_153855.jpg
Eureka. That is a metering piston. And the bearing that it presses on. They are not in contact. At all. Piston is jammed all the way in.

20231212_155756.jpg
Bit clearer after removing the flapper. All covered in varnish btw.

20231212_161319.jpg
Fuel distributor freed. Took a lot of 2lb hammer handle to the barrel nut to get this out. Severely caulked in with varnishy grime.

20231212_165243.jpg
Piston grime detail. Absolutely zero movement. It's in there solid.

20231212_152632.jpg
Oh yeah, found out where the sprinkles come from!
 
Last edited:

Pete49

Distinguished
Messages
64
Points
24
Location
Pt Augusta
WOW you are getting into the deep end now. I wish you success as these models are getting rarer if not dearer. I love mine and maintenance isn't that hard providing its in good condition but mine is throwing oil out at the front but I can't as yet find the cause. Joys of motoring in older vehicles I guess.
 
OP
ProfessorExperimental
Messages
125
Points
81
Location
Sydney
WOW you are getting into the deep end now. I wish you success as these models are getting rarer if not dearer. I love mine and maintenance isn't that hard providing its in good condition but mine is throwing oil out at the front but I can't as yet find the cause. Joys of motoring in older vehicles I guess.
Mines obviously overflowing due to the petrol wash down (and thinning the oil), so it could be weeping from the crank seal or another likely spot is the distributor shaft. I know my one has a worn out o ring on it. You could see oil above it on the shaft.

I didn't have a replacement the exact size (27OD×4 or x3, btw, so i think thatd be 23x4 or 24x3 in standard sizing). Tried a slightly smaller one but it ended up either being too thick or too stiff to reinstall, so I had to admit defeat and refit the old one.

Having just broken it with a pick. So of course now it'll leak even more.

P.S. apologies all for not finishing the text description in some of my posts: I find it much easier to add the photos when they're "Recent" on my phone and then type up the text later (ideally on the laptop), but often kids or work or sleep interrupts me. I'll try and do proper descriptive text as ans when I can, but in the meantime feel free to "read" the bare pictorials, often there's no caption required I guess...
 

Attachments

  • 20231205_125544.jpg
    20231205_125544.jpg
    7.4 MB · Views: 1
OP
ProfessorExperimental
Messages
125
Points
81
Location
Sydney
Looks like you're really getting into things, well done.
I found this quite useful when trying to get my 280SE to run properly
Cheers! That's the one I was referring to above. Generally very good but it does assume the engine runs already (unsurprising given the title). The way you can pre-set a baseline AFR with the flapper adjustment screw before even cranking the engine wasn't really clear to me until I read the porker forum hints, because they specifically mention the squealing noise which I had noticed, but don't (didn't?) know enough to understand fully.

Of course in my case they were never going to NOT squeal, because my fuel distributor is stuck at "full flow". So as soon as that was apparent teardown and rebuild was the only option.
 
Similar threads
Thread starter Title Forum Replies Date
SELfor50 450 SE 6.9 #2 Panzer Jager Mercedes W116 22

Similar threads

Top