Gleaming Beauty - Interior Work

More threads by Styria

Styria

The Godfather
Moderator
Messages
9,380
Points
492
Location
Sydney
At long last, I am close or have reached, the home stretch in the restoration of my 6.9. Sincere thanks must be extended to both Michel for helping out transport wise beyond the call of ANY duty, and to Jerry for carrying out such an excellent 2K - resparay job in two tone - something I have advocated for a long time and something I have finally been able to execute.

Much of the exterior work, and details thereof, are detailed in another section of the forum - I think it's in the Technical library. I may yet list part of that exterior work in numerical order in another thread, but for the time being I will concentrate on the interior work carried out.

1. Freshen up all four door step panels, replace and paint left front
passenger door trim.

GleamingBeautyRestoration005.jpg

GleamingBeautyRestoration002.jpg

2. Paint interior floors with POR 15 on RH side - front and rear.
3. Freshen up interior front, rear and side roof panels.
4. Freshen up door aperture draught strips - the CORRECT fitment of those
is quite difficult and time consuming.

GleamingBeautyRestoration001.jpg

You have a similar set-up in the other areas as well. I also find that the fitting of the interior side panel, the front and the 'A' pillar trim require considerable skill and patience - believe me.

5. Re-pack the back rest of the rear seat - it suffered from the normal
problem of the callicoe disintegrating and the stitching no longer holds
the pleats in place.
6. The bottom section was done years ago - still in great shape and had
several applications of saddle soap and hide food.

GleamingBeautyRestoration004.jpg

7. Freshen up sun visors.
8. New rear parcel shelf carpet.
9. Sunroof frame removed, cleaned of surface rust, and painted with
POR 15.
10.Service Pioneer Header unit at a cost of $100.00 - sorry, will need to
find picture.
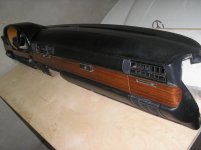
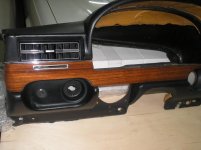
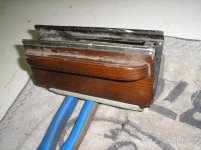
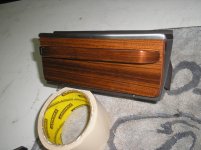
11.Re-furbish and re-lacquer all interior timber panels - incidentally, I have
a good selection of those for sale. Not cheap, the amount of work is never
ending. Each panel has at least six or seven coats of clear.

GleamingBeautyRestoration012.jpg

GleamingBeautyRestoration010.jpg

GleamingBeautyRestoration009.jpg

GleamingBeautyRestoration011.jpg

12.Replacement Front and Rear screens.
13.Tint all windows.
14.New sill panel carpets, and carpets under front of back seat.

I think that just about covers the interior. It doesn't sound like much, but in reality the car has undergone a complete rebuilding process. Regards Styria

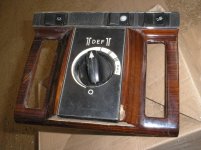
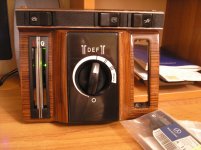
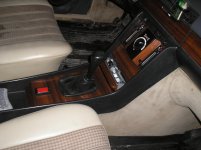
N.B. Well, I mustn't forget the centre console - completely re-done and freshened up.

Also, if you care to have a look at the top of the rear door, the fit of those strips where they join leaves a lot to be desired. This will need to be fixed as the photograph is somewhat unkind.
 
Last edited:

260ebenz

Master
Messages
6,668
Points
175
Location
NSW
Hello Styria thanks for the update about the GB project which is looking great and all the best with the project.

Cheers Tim.
 

Tony66_au

New Member
Messages
2,306
Points
0
Location
Gippsland, Vic
Nice work on the timber Styria, Its a bugger to get right and I experimented with this a lot in my Jag phase.

I ended up with an interesting system, Id prep the piece and lightly sand the surface to remove bubbles or strip the piece back very very gently so i didnt damage the veneer.

Then id use Wattyl 7008 2 pak clear (Great on floors) and pour the clear onto the piece which was lightly PVA glued onto a few pieces of broomhandle (21mm dowel) stuck to a flat board and as it dripped off the sides id gently swipe or scrape the excess off the bottom edges with a putty knife, leave it for 20 mins to start to set and then scrape the remainder of the drops off the edges.

With larger pieces id brush the 7008 on with a long hair edge cutting brush to cover the surface and then pour the remained over top to achieve a mirror finish but this was an expensive way to do just one piece because you cant clean the brushes.

The result was so good i ended up doing 3 sets for a guy I knew as he had mediochre results getting them done with other products.

The end result looks like the pieces had been dipped in clear plastic and were mostly flawless.

A bit exxy but the results were worth it.
 
OP
Styria

Styria

The Godfather
Moderator
Messages
9,380
Points
492
Location
Sydney
Hi Tony, your method is far 'craftier' than mine. I know that if you brush enough coats and rub back lightly in between, you will get a close enough to mirror finish. I use a spray gun and my biggest enemy is dust, and the odd speck of dirt being emitted by the gun - at least, that's all I can think of. Also, at times, I find it a little difficult to come up with the correct viscosity of the clear which, incidentally, I mix with a slight amount of mineral turps. So,spraying can be a bit hazardous from a quality point of view.

We have also used 2-pack Automotive Clear as a final coat, but clean up is messy and the stuff can be quite expensive when you start using it in small quantities. Lately I have been using BONDALL HIGH GLOSS and that gives a brilliant shine. The photos that you see in this thread do not necessarily show the finished product. There is still a bit of recolouring and a rub-back or two required before I am all done. Regards Styria
 

Tony66_au

New Member
Messages
2,306
Points
0
Location
Gippsland, Vic
My motivation was sheer laziness to be honest, and dust is a bugger even with the 2 pak however I did find that spraying 2 pak auto clear and colour the gun would static charge the paint particles which added to the dust embedded in the paint.

I ended up borrowing my (Now Ex) wifes plastic greenhouse and using a coarse hepa filter and a dust extractor (Big vacuum cleaner) and zipping the glasshouse door shut created a fairly dust free environment especially when I wet the floor down but it created a cramped and very hot work space so for the bigger pieces such as the full width head piece above the front screen and the top of the dashboard (Mk 10 jag) I ended up using a local spray booth.

I admire your dedication to finish as its not a job id happily tackle again although the center console piece on my 230TE looks tempting should I decide to experiment.

Then again I can always buy a refurbed unit lol
 

Oversize

Grand Master
Messages
5,753
Points
596
Location
Melbourne
I can honestly say I've never been a huge fan of timber in cars, but after seeing those pics from Styria and Serg I think they're great! I've always loved timber with a beautiful grain, that's been heavily coated in clear. Like it's been dipped in a thick resin.... Assuming mine's not badly warped, I'll be having a go at that myself!
Styria is there still room for your bed in your place? You've got so much stuff, even I'm amazed! And your enthusiasm for having a go at tasks that're completely different is an inspiration! :D
 
Last edited:
OP
Styria

Styria

The Godfather
Moderator
Messages
9,380
Points
492
Location
Sydney
Has anyone had a good look at Sergeich77's Photobucket pics ? It would seem to me that he has carried out an absolutely perfect restoration of his timber. Unfortunately, I don't seem to be able to increase his pictures size. Also, have a look at the gearchange lever - obviously a four speed manual 116. Very interesting. Regards Styria
 

Michel

The Prince of Arabia
Moderator
Messages
10,021
Points
775
Location
Sydney, Australia
Unfortunately, I don't seem to be able to increase his pictures size. Regards Styria

Just click on the picture Godfather and magic.... it will open larger :D
 

Tony66_au

New Member
Messages
2,306
Points
0
Location
Gippsland, Vic
Just click on the picture Godfather and magic.... it will open larger :D

It looks like sergeich has put a lot of Time, Patience and Love into his veneers.

Something Russians seem to have that comes from within.

By the way the finish is similar to what I achieved with the Jag walnut using epoxy clear.


P10100112.jpg

P1010014.jpg

P1010013.jpg

P1010027.jpg

P1010003.jpg
 

Oversize

Grand Master
Messages
5,753
Points
596
Location
Melbourne
Styria good pickup about the manual box! I was staring at the woodgrain so much I missed it completely!! :D
 

WiSeGuYY

New Member
Messages
1,216
Points
0
Location
Cairo Egypt
LOL , that why i keep call him the GODFATHER , i will need his advise about the inner door pannels of my project BLU when i reach this stage which looks a good year from now sigh........ i have almost same color in the interior.

REGARDS

TAREK
 

300SDude

New Member
Messages
228
Points
0
Location
Hunters, WA. (USA)
Beautiful, beautiful wood work!

Mine has lived in the sun for many years (previous owner) and it shows. There are several cracks in the lacquer on both the console pieces, and a couple in the dash pieces.

The one around the air conditioning unit is cracked in several places.

when I just had the center console out, I thought about sanding it down and re-lacquer it, but I didn't want it too look odd compared to the rest of the car. Maybe I will find one from someplace else and practice on it before I even attempt to do what's in the car.

I saw a picture somewhere online that the tops of the doors (where you would rest your arm at the window) were also done in wood. I can't remember if it was the whole door piece (not including the inner panel) or a wood cover that went on over the existing plastic cover? I thought it looked gorgeous.

I am a sucker for real wood. Most American cars use wood sticker on everything and I detest it! It looks horrible and cheap. Just give me regular plastic, colored plastic before you start sticking that crap all over my car. I remember when they used to make "woody" station wagons with that damned sticker stuff and some fake molding.....after about 5 years, half the molding was missing and the sticker crap either started pealing off or was severely faded or both! In my opinion......if it's sticker, I really don't like it.

300SDude
 

sergeich77

New Member
Messages
13
Points
0
Location
Russia
Thank you Sergeich77, that's looking just fine - have you yet refitted the dash to the car ? Keep in touch about progress. Regards Styria

Update)) A few more photos ... dash will install the following summer, after painting the body
 

Attachments

  • P101001.jpg
    P101001.jpg
    354.2 KB · Views: 14
  • P1010141.jpg
    P1010141.jpg
    333.8 KB · Views: 16
  • P1010137.jpg
    P1010137.jpg
    383.5 KB · Views: 14
  • P1010135.jpg
    P1010135.jpg
    340.8 KB · Views: 18
  • P1111001.jpg
    P1111001.jpg
    273.1 KB · Views: 21

Michel

The Prince of Arabia
Moderator
Messages
10,021
Points
775
Location
Sydney, Australia
Nice 'before and after' pictures Sergeich77.

nice refurbishing, they look excellent.

on a side note, obviously in Siberia A/C is not required :eek:
 
OP
Styria

Styria

The Godfather
Moderator
Messages
9,380
Points
492
Location
Sydney
Hi Michel, that's probably one of the reasons, but it should also be borne in mind that 'basic' or 'poverty' models were not fitted with Air Conditioning. That switch panel, with just the one dial, is quite rare. To get back to his work, I suspect he may be a carpenter or sone woodcraft expert - it just looks so professional if you have a look at his previous pictures. Regards Styria
 

Tony66_au

New Member
Messages
2,306
Points
0
Location
Gippsland, Vic
Restoring timber veneer is something that takes meticulous attention to detail, I tried it with Burr walnut when i had Jags and for me it was hit and miss so Sergeich's work is very nice indeed.

Tony
 
Similar threads
Thread starter Title Forum Replies Date
Styria Suspension issues - Gleaming Beauty Mechanicals 5
Styria Gleaming Beauty - 6.9 General Work Interiors 3
Styria Rust and Dirt - Gleaming Beauty Exteriors and Body Repairs 12
Styria Sick 6.9 - My Gleaming Beauty Mechanicals 7
Styria Gleaming Beauty "burning" Mechanicals 9
Styria Gleaming Beauty Disaster Mercedes W116 16
Styria Gleaming Beauty - First Baby Steps Mechanicals 36
Styria 6.9 ID plate - Gleaming Beauty. Mercedes W116 13
Styria Rust in Gleaming Beauty Exteriors and Body Repairs 9
260ebenz Check out this beauty! Gumtree/eBay/Facebook Listings 11
Styria Sleeping Beauty Restorations Websites and Links 2
260ebenz Speed + Style + Beauty Websites and Links 2
Martin280s A Brazilian Beauty! Gumtree/eBay/Facebook Listings 7
Des Now this is a thing of beauty Talking Torque 2
RT 420SEL W126 Interior door trim clip repair. Centre burl trim. Interiors 2
Oversize Custom Interior Mercedes R/C107 0
H New S Class interior Interiors 3
Michel Interior for sale -SOLD Gumtree/eBay/Facebook Listings 13
Styria S Class Interior Interiors 13
Styria S-Class Concept Interior Websites and Links 1
motec 6.9 Red with Parchment interior 6.9 Gumtree/eBay/Facebook Listings 8
Oversize 450SEL with red interior for sale Gumtree/eBay/Facebook Listings 1
Michel Fitting the interior on Bluey Mercedes W116 1
CraigS 230SL interior parts wanted Mercedes R/C107 2
Oversize Cheap AMG kit & nice interior..... Mercedes W116 5
L Cheap 116 Interior? Gumtree/eBay/Facebook Listings 2
SELfor50 FS: W116 - SE - Blue Interior / Trim - Excellent Condition Gumtree/eBay/Facebook Listings 0
Parks LEATHER interior kits for sale (limited time) Interiors 13
Parks the making of a leather interior Interiors 23
B FS [melb]: W116 interior parts (black), seats, door cards, etc. Gumtree/eBay/Facebook Listings 2
s class R107 interior retrimming Interiors 11
abl567 New interior wood for Six 3. Mercedes W108 and W109 7
J 560 SEL Interior (complete) for sale Gumtree/eBay/Facebook Listings 5
M The Chronicles Of Mercules - Interior Design Interiors 4
B Black interior: 280S/SE in Victoria, Au Gumtree/eBay/Facebook Listings 0
Des Interesting interior mods W123 Talking Torque 4

Similar threads

Top