Central Locking - Fix it !

More threads by Styria

Styria

The Godfather
Moderator
Messages
9,370
Points
492
Location
Sydney
Well, it's far easier said than done. I have experienced problems with Gleaming Beauty for a number of years, as well as Wilhelm, the Astral Silver 6.9 that I used to own, but is now in the hands of ChrisP., domiciled in WA.

With Gleaming Beauty, I had one somewhat unsuccessful visit to one experienced Mercedes mechanic, with not a lot of success, and in the end I really gave up - too time consuming to be travelling to and from his workshop. With "Wilhelm", another experienced MB mechanic, also had at least two attempts to get things working but, again in the end, he failed to fix the problem, whatever it was or were, on at least two occasions. Very disappointing, as money changed hands each and every time for no permanent fix.

So we come to another 6.9 (all models are the same, i.e. 280, 450 etc.) also with a problematic central locking system. You could obviously lock the driver's door with the key, but no response from any of the other doors, not filler flap, but the boot did lock itself. Where do you start ? Well, I took off all four door trims, and boot lining, and started sucking on the various valves until I was black and blue in the face. I spent hours and hours, and hours...to no avail, and frustration was at a maximum. It was a case of the totally blind leading the ever more so totally blind. In the end, I gave up, but I was determined to have another crack at it at some time. Gleaming Beauty, of course, was another to suffer all kinds of problems, and with everything dismantled (door trims etc.), it was an excellent opportunity to try and rectify whatever problems on my own accord. More to come. Regards Styria
 
Last edited:
OP
Styria

Styria

The Godfather
Moderator
Messages
9,370
Points
492
Location
Sydney
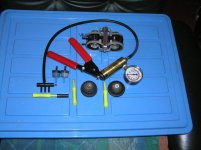
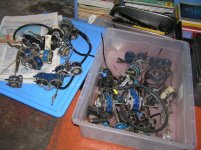
I have already referred to my "blue and black in the face" efforts, and it was evident that a vacuum pump was the most essential tool to have at one's disposal. The following illustration shows:

1. The vacuum pump I bought, as well as some components of the system.

MechanicalKnowHow1012.jpg

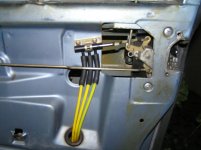
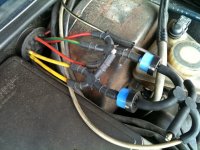
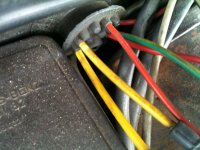
The next pictures illustrate:

a. The master switch located on the driver's door - a most important component.

b. The blue/black one way valves located in the engine compartment. There is another one of those valves well behind the instrument panel.

c. The vacuum pipes - again under the bonnet.

MechanicalKnowHow1014.jpg

MechanicalKnowHow1010.jpg

MechanicalKnowHow1011.jpg

In order to test the system, it is essential to remove the driver's door trim and disconnect the y/r (locking) and the y/green (unlocking) lines. In addition, it is essential to disconnect the yellow/grey line that leads to the main reservoir located under the parcel shelf in the boot, AND BLOCK IT OFF.

Connect your vacuum pump to either locking/unlocking vacuum lines (one at a time), and start pumping. You will soon see which of the two systems holds pressure. Once you have established the one at fault, one needs to establish which of the diaphragm mechanisms located in:

The three doors,
Fuel Filler flap, and
Boot locking system,

is at fault - in other words, don't hold the pressure. You will need to test one at a time, and it is also essential to establish that the two blue/black one way valves under the bonnet are holding pressure - these are tested with the vacuum pump. As far as the diaphragms are concerned, you will more than likely have to remove the trims (doors, r/s of boot and rear of boot) to gain access to these valves. Naturally, whichever component is at fault, will need to be replaced. The master switch on the driver's door distributes air provided by the plain yellow middle vacuum line to either the locking/unlocking lines governed by the lock operation carried out with your key, or the positioning of the locking/unlocking button.

I still haven't quite gotten to a locking problem with Gleaming Beauty - so far it has defied my attempts to rectify that part of the operation. One other item(s) to have on hand is a copious supply of spare parts, by way of diaphragms, piping and master switches. All of those I bought, or salvaged from cars that I dismantled. See the last picture.

MechanicalKnowHow1015.jpg


Good luck, Styria
 
Last edited:

Tony66_au

New Member
Messages
2,306
Points
0
Location
Gippsland, Vic
You are truly a Gent and a Scholar Styria!

Can you tell me what the item is with the metal bracket and the 2 bellows? (In the pic with the Vac pump)

Having dealt with Vac issues on other makes I usually found that replacing ALL one way valve pots was a good move as a starting point as over time condense and dust tends to make them less efficient.

The question is are they available and if so at what cost?

Regards,
Tony
 

SEL_69L

Aristocrat
Messages
1,320
Points
95
Location
Sydney, NSW, Australia
If the system won't hold vacuum, I am just figuring that the rubber sleeve connectors have aged enough to let air in at the joints, or I figure much less likely, a plastic line may have a tiny split.

If the sleeves are the cause of the problem, they don't appear to be too expensive to replace.

My tuppence worth.
 

WGB

New Member
Messages
1,289
Points
0
Location
Perth Western Australia
Some of the plastic tubing had become brittle as well on my car and if left undisturbed is often OK but if you do a repair and move it it can snap - this happened when I replaced my blower motor - the length that runs under the dash up in the left hand corner where it can presumably get some heat off hot metal exposed to the sun.

I assume if you are going to start to repair this system doing the lot has some advantages.

There is a diagnostic flow chart for the HVAC part in the workshop manual.

Bill
 
OP
Styria

Styria

The Godfather
Moderator
Messages
9,370
Points
492
Location
Sydney
You are truly a Gent and a Scholar Styria!

Can you tell me what the item is with the metal bracket and the 2 bellows? (In the pic with the Vac pump)

Having dealt with Vac issues on other makes I usually found that replacing ALL one way valve pots was a good move as a starting point as over time condense and dust tends to make them less efficient.

The question is are they available and if so at what cost?

Regards,
Tony

Hi Tony, the "metal part bracket" connects to the rods that lead to the lock-unlock buttons on all doors except for the driver's door. Thus you have the twin diaphragms that react to suction from the system with the engine running or, if the system is working properly, there should be enough air storage in the vacuum tank situated under the rear parcel shelf.

You also have single diaphragms on each, that is the fuel filler flap and the boot locking mechanism. As you can see from the first picture, the diaphragms are moulded to the alloy bracket. The diaphragms can be bought from the dealers, or better still from the Classic Centre in the States, but disassembly of the alloy hooks (none illustrated) can be difficult on account of corrosion. It is also fair to say that the upper diaphragms are more prone to corrosion and splitting of the rubber as they are exposed to the ingress of water and dirt from 'up on top'.

Yep, the yellow 'thingies' are indeen Golf tees. Believe it or not, but the vacuum pump is sensitive enough to pick up ever so slight a leak from where the tees have been moulded and have the slightest edge on them. I smoothed them with fine sand piper. Regards Styria

N.B. Not sure about replacement cost of diaphragms, but as you can see I have plenty of replacement items on hand - luckily !
 
OP
Styria

Styria

The Godfather
Moderator
Messages
9,370
Points
492
Location
Sydney
Some of the plastic tubing had become brittle as well on my car and if left undisturbed is often OK but if you do a repair and move it it can snap - this happened when I replaced my blower motor - the length that runs under the dash up in the left hand corner where it can presumably get some heat off hot metal exposed to the sun.

I assume if you are going to start to repair this system doing the lot has some advantages.

There is a diagnostic flow chart for the HVAC part in the workshop manual.

Bill

Hi Bill, 'manhandling' is invariably the cause of the plastic tubing braking, particularly under the bonnet. I guess it is handy to know that the 116 library has details of the system, but I must admit to not having looked at their library for years now. Regards Styria
 
OP
Styria

Styria

The Godfather
Moderator
Messages
9,370
Points
492
Location
Sydney
I can add some further information and observations having fixed a member's 6.9 that persistently failed to hold pressure in the system. The problem seemed to be on the left hand side of the car, but to find where, and to be absolutely sure, required some exrensive checking. For anyone wanting to take on this job, this is ONE of the ways to do it.

1. You need to purchase, or have a vacuum pump on hand. Without, you're
just not in the hunt.

2. There are two main vacuum lines protected by the blue/black valves
under the bonnet. Check that the two valves would hold pressure.

3. Connect your vacuum pump fitting to each vacuum line, in turn, to see
which part of the system is leaking. The yellow/grey line runs all the way
back to the vacuum reservoir under the rear parcel shelf. With this
member's 6.9, there was a fairly rapid leak in that line - this line runs
from under the bonnet across to the left hand side of the car (under the
screen, down the 'A' pillar, along the sill panel, behind the back seat and
emerges in the boot to feed into the reservoir.

4. The plain yellow line runs all the way to the master switch that's
attached to the driver's door behind the door trim, and from that
switch you have two vaccum lines running to all sections of the car.
Yellow/Green is the unlocking circuit, Yellow/Red the locking.

5. Initially, test each circuit to see if it holds pressure. The action of the
pump supplies sufficient suction to operate the locking/unlocking
functions of the system - that is of course, that each of the two
systems holds the pressure.

6. It is also imperative to check the master switch for its locking and
unlocking functions. The chromed steel plunger has an 'O' ring that
performs those functions by sliding from side to side.

By this time, you will have located the area of leakage, and it is then that you are likely to need some spares. Diaphragms for the three doors (twin units), another master switch, the blue'black vacuum valves, the rubber grommet that is fitted to the reservoir tank, or the boot and/or filler flap units. Those have to be bought complete - no separate diaphragms available for those. They can be pricey.

With the member's 6.9 (SEL69L), a replacement vacuum line had to be fitted between the firewall and the bottom of the 'A' pillar. The system now holds pressure overnight. If there is anything else that needs to be added, I will do so in due course. Slow leaks can be hard to find, but again I stress that you must have that pump. Regards Styria
 
OP
Styria

Styria

The Godfather
Moderator
Messages
9,370
Points
492
Location
Sydney
Styria did not mention two other esential tools required for this job:

1. persistence
2. patience.

Well, one needs a bit of each of those - agree. Now, I am a little further down the track, and again a little bit the wiser. I have just done the central locking on my mighty 450, namely "Goldie". The whole job of checking I have already described, and not a lot really needs to be altered as far as description of the work is concerned. With Goldie, for quite some while I kept chasing the leak. Unlocking worked just fine, but locking proved to be very elusive. Naturally, again I started with the master switch in the driver's door, and then I closed off various areas one at a time. In the end, I established that the right side was okay, but not the "left". It was difficult to find the leak, but in the end it turned out to be in the vacuum piping that leads from the driver's side (just below the screen) right across to the 'two-way' vacuum switch in the passenger door. I removed all of that piping, and replaced it with a new unit - wrong colour but it works. Feeding the piping down the 'A' pillar and into the front door is pretty tricky, but I did make more of a fist with it than what I had been tortured with on a similar job with Gleaming Beauty. Can't beat experience - so they say. Regards Styria

N.B. BTW, it would have taken the best part of about five to seven hours.
 

Michel

The Prince of Arabia
Moderator
Messages
10,020
Points
775
Location
Sydney, Australia
You can never have enough experience Godfather...

It is simply priceless.

Well done;)
 

BenzLover

Benz Whisperer
Messages
106
Points
0
Location
Capalaba,Queensland and Vancouver Canada
Nice job
Cheers
Big Dan
 
B

BAR

Guest
Given the possible scenarios...
Cracks in the rubber bellows which move the locks up and down
Broken 'T' pieces
Spring on the petrol filler / bent pin
Vacuum lines

I have managed on a few occasions when mine plyed up to park the car in a VERY quiet place and then listed carefully to locate any hissing sound.

The common causes for loss of vacuum in my experiences are Cracked Bellows in the doors and cracked vacuum lines. The bellows have to be replaced with OEM parts, one assembly in the doors yields 4 bellows, so if you have to buy or manage to scavenge some from wrecked vehicles, don't throw the whole lot out. remeber to clean and lubricate the assembly, years of sitting inside the door cavity does lead to corrosion of metal parts.

With the vacuum lines, I have found that most auto parts places stock silicon hose that will slip over the MB line. The lines usually crack in the areas aound the doors, over time opening and closing the doors and brittleness due to ageing combine to cause this problem. The silicaon is very flexible and I cut out the section near the floor and run the hose through the door to the bellows.
 

Oversize

Grand Master
Messages
5,753
Points
596
Location
Melbourne
This thread might be of interest to you oldarmy (boots)!! :D
 
OP
Styria

Styria

The Godfather
Moderator
Messages
9,370
Points
492
Location
Sydney
I can't believe that all this was written more than six years ago. Where is the time ? Where are the holidays I should have had ? To make matters worse, I am presently experiencing another obscure problem with Gleaming Beauty - which I want to fix. Regards Styria
 

Oversize

Grand Master
Messages
5,753
Points
596
Location
Melbourne
What are the symptoms?
 

sean sherry

Master
Messages
2,005
Points
189
Location
sydney
Michael, without a vacuum Pump sorting an Automatic Transmissions controlled by a Vacuum Modulator is impossible. An essential Tool in any Workshop as you have found. Also your patience has no bounds. Mine has diminished with the ageing process !
 
OP
Styria

Styria

The Godfather
Moderator
Messages
9,370
Points
492
Location
Sydney
I am still experiencing a problem with a fault in the system - what is the fault ? Well, it doesn't work the way it should, but honestly as I have not used GB to any extent, I have put the job on a backburner. I will post on TK as soon as I get the opportunity to test and rectify whatever problem there is. Regards Styria
 

Similar threads

Top