Astral Silver 6.9 body preparation

More threads by Styria

Styria

The Godfather
Moderator
Messages
9,370
Points
492
Location
Sydney
In Benz Lover's thread, which I partially hijacked, I showed some pics of work carried out on my Astral Silver 6.9 prior to painting. BTW, Benz Lover, I do extend my apologies for having cut in on your excellent post.

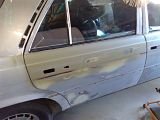
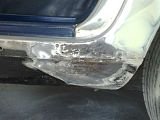
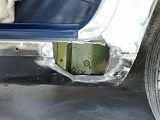
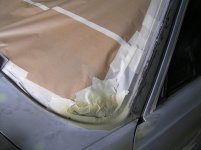
We have since remopved the front screen, with the left hand bottom corner showing two small rust holes, as well as the left rear most section of the sill panel. In each section, the rust has been cut out and new pieces welded in.
ChrisPearsonAstralSilver69035.jpg

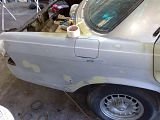
In the above shot, the screen had already been moved. Then further pics...
ChrisPearsonAstralSilver69036.jpg

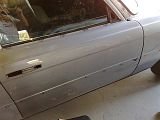
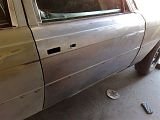
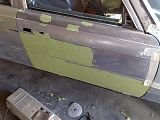
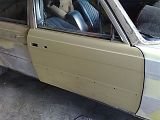
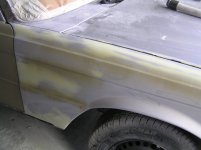
The whole of the right hand front door was stripped back to bare metal and a slight smear of filler applied and sanded back..
ChrisPearsonAstralSilver69038.jpg

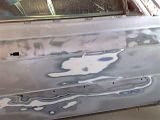
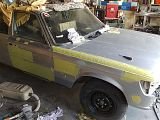
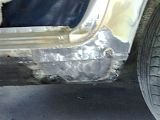
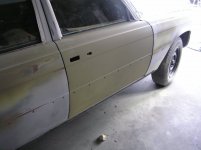
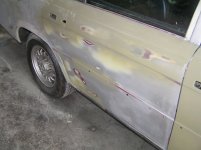
More work, on right rear door this time..
ChrisPearsonAstralSilver69039.jpg

All in all, excellent progress is being made by Parks. In addition to the pics shown the bonnet has now also been finished and the next step will be the roof and sunroof - both with slight hail damage. Regards Styria

N.B. Hopefully, more pics yet to come that were taken by Parks with his Nokia N95.
 

Michel

The Prince of Arabia
Moderator
Messages
10,020
Points
775
Location
Sydney, Australia
It's coming along nicely Godfather....

But why did you have to rub back the door to metal?
 
OP
Styria

Styria

The Godfather
Moderator
Messages
9,370
Points
492
Location
Sydney
It's coming along nicely Godfather....

But why did you have to rub back the door to metal?

Michel, there were just that many layers of previously applied paint. It had all started cracking quite badly - huge , and I mean huge crow's feet - you just had to get rid of all that stuff. Parks has e-mailed me a number of more revealing pics. but presently I am unable to transfer them to this thread. Regards Styria...Don't know how to....
 

chrisp

New Member
Messages
176
Points
0
Location
Perth, WA
I think I should be able to supply those photos. Perhaps, Styria or Parks, you could comment on each if you feel further explanation is required?

Btw, I visited the car today in the flesh and it's clear the preparation prior to repainting is extremely thorough. Thanks! :D

th_150420092403.jpg

th_150420092404.jpg

th_150420092405.jpg

th_150420092406.jpg

th_150420092408.jpg

th_150420092410.jpg

th_160420092412.jpg

th_160420092413.jpg

th_200420092415.jpg

th_200420092416.jpg

th_200420092417.jpg

th_210420092418.jpg
 
OP
Styria

Styria

The Godfather
Moderator
Messages
9,370
Points
492
Location
Sydney
Hi ChrisP, thank you for posting the pictures and your approval of the preparation process. Just as an aside, I absolutely marvel at what you have done with Photobucket and the way it's been arranged, or to put it differently, the options you have created, or the options one can choose. Doesn't help if one's computer knowlege can be considered scant at best as in my case.

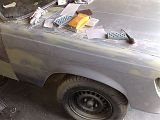
Perhaps some may consider the amount of filler as shown on right front guard and doors as excessive. We believe that, in the states, restorers of exceptional standard insist on using filler to obtain that perfecr, ripple free surface. In this case, both panels showed but slight signs of uneveness, and this was the way to eliminate that. If you look at another front guard picture in the previous post, you will note that there is hardly any filler left - most of it has been rubbed back. Anyway, we'd be very interested in comments from everyone. Regards Styria
 

s class

New Member
Messages
788
Points
0
Location
South Africa
comments? Skimming the whole panel like that looks like a hell of a lot of sanding.
 
OP
Styria

Styria

The Godfather
Moderator
Messages
9,370
Points
492
Location
Sydney
comments? Skimming the whole panel like that looks like a hell of a lot of sanding.

Hi S-Class, you're not kidding anyone as it is time consuming. I am not going to make any comments regarding his work. He obviously aspires to certain standards, but it may be best to let him explain his reasons for doing it the way he does.

Reading this reply, one could be forgiven for thinking that I am criticizing your post - far from it, I am just not expressing myself properly. The other day, we had occasion to see a Roundie belonging to an ex-member. That paint job was almost four years old and the car looked a million dollars.

I was tempted to take photographs, but for various reasons decided against it. It was one of Parks' efforts. Regards Styria
 

Parks

New Member
Messages
240
Points
0
Location
Sydney
comments? Skimming the whole panel like that looks like a hell of a lot of sanding.

Looks like a lot of work Ryan but with the right tools and experience I knocked that door over fairly quickly, from memory it was approx 2hrs...

Basically the reason why I do this is cos the whole bootom surface was uneven, so instead of trying to work out where to fill etc its easier to just wipe the whole panel and this way I create a new surface which is totally flat, like with what I did with the top of the drivers front guard....
Sometimes when you have an uneven surface and you only fill certain spots it makes it hard to get the panel straight because different materials sand in different ways, like bog ,old paint, and metal, so when your blocking down a surface obviously the bog is sanding but theres no give in the metal high spots so that can give you an uneven surface cos one is getting lower than the other so it best to create a whole new surface....
Dont think that bog is your enemy cos its not, its there to help, and dont think that the bog im leaving there is like half and inch thick, in most places its no more than half a millimetre thick, bog is only bad if its used over rust, the best hot rodders around the world generally skim the whole car in filler to ensure their new flat surface.....
regards Brent
 

s class

New Member
Messages
788
Points
0
Location
South Africa
I was not criticising your decision toskim with filler, more I was sympathising with you, because I know how much work that is. If you did that door in two hours, that's really quick. could you post pictures (if and when you get the time) of the files etc you use for something like that?

I'm self taught at body work, and I can generally get a good result, but I'm usually painfully aware that there must be quicker methods to get there than what I use.
 
OP
Styria

Styria

The Godfather
Moderator
Messages
9,370
Points
492
Location
Sydney
I was not criticising your decision toskim with filler, more I was sympathising with you, because I know how much work that is. If you did that door in two hours, that's really quick. could you post pictures (if and when you get the time) of the files etc you use for something like that?

I'm self taught at body work, and I can generally get a good result, but I'm usually painfully aware that there must be quicker methods to get there than what I use.

Hi S-Class, I knew that you were not criticizing Parks' method of doing things, nor was I being critical in any way of what you posted. You know, I looked at what I had written and said to myself "this really doesn't sound right", but do you think I could come up with something better ? No, nothing but a blank - maybe I was tired or whatever.

I am sure that Parks will respond to you to explain and/or illustrate for you the equipment and grade papers he uses. It's like with most things - one does things in a certain way, because we think that is the way it should be done. Then you start talking to tradespeople, you start watching them and all of a sudden you realize "Hey, how cumbersome/slow/ineffective is the method I have been using". Can't beat experience and the ability to learn something new every day. Regards Styria
 

Parks

New Member
Messages
240
Points
0
Location
Sydney
Hi Ryan, yeah I didnt take it as criticism at all, so its all good on that front:), I just use the round orbiting sander, and I basically take magority off with either 40 or 80 grade paper till ive got it close to where I want it, I then just use the block with 100g to get it flat and just before its right I finish off with either 180 or 220 either by block or the orbiting sander with a foam pad between the machine and the paper so it doesnt dig in and that eliminates most of the deep scratches from the course paper . The Hi fill primer then doesnt have work so hard to fill scratches and you are less likely to have sink back later on when the paint settles.......regards Brent
 

Parks

New Member
Messages
240
Points
0
Location
Sydney
Hi Benzboy, sink back is not a good thing, its if the prep isnt good enough and after a while you can start to see a line in the paint where some repairs have been made ,its basically the prep or repairs underneath the paint doing funny things , you can sometimes see scratches in the prep in the right light also.....
 

s class

New Member
Messages
788
Points
0
Location
South Africa
Sinkback is inexcusable these days with the high quality HS primers available. WHen I started using standox stuff 10 years ago I used to be more careful about avoiding sinkback than I am now. Their lates HS-ProFill 2K
HS primer is astonishingly good.

However, I too, do most of the filler work with P100, and then finish with P180 or P220. In fact, if I do that, often the 1K etch primer can deal with the scratches completely and I don't even need the 2K KS-ProFill.

I have no power sanders :( hand power only.
 

Parks

New Member
Messages
240
Points
0
Location
Sydney
Thanks S Class - so I wonder why I see sinkback from one of Sydney's more prestigous panel shops? Hmmm. Food for thought, I guess.
Regards,
Benz-Boy

I think because things arent allowed to settle for long enough and sometimes arent fully cured, everythings quick,quick,quick get it finished:confused:

Ryan unfortunately sometimes sinkback can raise its head unexpectably without any reason occasionally.....but I do tend to agree that with someone with a heap of experience it probably shouldnt happen.....regards Brent
 

Parks

New Member
Messages
240
Points
0
Location
Sydney
Sinkback is inexcusable these days with the high quality HS primers available. WHen I started using standox stuff 10 years ago I used to be more careful about avoiding sinkback than I am now. Their lates HS-ProFill 2K
HS primer is astonishingly good.

often the 1K etch primer can deal with the scratches completely and I don't even need the 2K KS-ProFill.

I thought you had to use the 2k to seal the surface Ryan? I didnt think 1k would do the job?? do you use a hardener with your 1k?
 

s class

New Member
Messages
788
Points
0
Location
South Africa
Standox makes a 1K-primer that is an etch primer. If can be used in three ways :

a) etch coat (obviously a thin application). When dry, it must be sanded then overcoated with 2K-HS

b) fillerprimer - spray 2 to3 coats medium heavy, when dry, rub it back and apply top coat. This makes a quick job, but with 1K I'm more concerned about the possibility of sinkback, so I give it at least a week to dry before sanding and overcoating

c) 3-stage wet system (if you are REALLY in a hurry) - over bare metal, spray one thin coat of the 1K etch, and just after its flashed off, spray bascoat and clearcoat as normal.

I only recently found out about c) from the Standox data sheet - I tried it once and I was not impressed - because there is no denibbing involved.

I normally follow method a), which I'm sure is the norm with other brands of 1K primer. I reserve b) for panels that don't have filler usually. As to its success, I painted my Ford like that 10 years ago and it still looks perfect.

These methods are specific to the Standox 1K-fullprimer, and I would not assume they can be used with other brands.

I must admit though that I feel happier with the concept of a 2K primer under my topcoat, which is why I normally paint in option a).
 

Parks

New Member
Messages
240
Points
0
Location
Sydney
Thanks for that Ryan, thats basically the rules I follow aswell, I just wasnt sure bout the 1k over filler repairs but you cleared that up, I to would definately put hi fill over the repairs cos it needs to be sealed, I have used paint over etch before but only for tiny jobs but for everything else I use the 2k hi fill....
 
Similar threads
Thread starter Title Forum Replies Date
Styria Astral Silver 6.9 Gumtree/eBay/Facebook Listings 4
zej Car (UK) September 1977 - 450SEL 6.9 vs Daimler Double-Six vs Silver Shadow II vs Cadillac Seville Road Tests 7
W126GUYSYDNEY My Love for the W116 1979 450SE Silver green Mercedes W116 4
Oversize The Silver Pig Talking Torque 0
S Painting Silver Alloys Articles 12
c107 Trip to the Arctic in a cheap Silver Shadow Websites and Links 2
motec 6.9 RR Silver Cloud Icon built Road Tests 5
Styria Rolls Royce 2015 Silver Ghost Road Tests 0
motec 6.9 Silver Arrows/Auto Union Goodwood Talking Torque 0
Oversize Silver Aussie 6.9 for sale Gumtree/eBay/Facebook Listings 24
Oversize Silver AMG 6.9 Mercedes W116 9
260ebenz Silver Stars for sale Websites and Links 0
260ebenz Mercedes Silver Arrow Concept Articles 0
Oversize Silver Arrow Mercedes W116 13
motec 6.9 RR silver Cloud 11 Shannons Gumtree/eBay/Facebook Listings 2
motec 6.9 Rolls Royce Silver Seraph Gumtree/eBay/Facebook Listings 11
motec 6.9 1949 Silver Wraith Talking Torque 2
motec 6.9 1933 Peirce Arrow Silver Arrow Talking Torque 1
motec 6.9 1959 Silver Cloud convertible Talking Torque 1
motec 6.9 Uniquecars RR Silver Seraph Talking Torque 5
Oversize Silver 450SLC for sale Gumtree/eBay/Facebook Listings 1
Oversize Silver 6.9 for sale Gumtree/eBay/Facebook Listings 8
motec 6.9 1954 silver wraith vignale saloon Talking Torque 0
motec 6.9 1954 Silver Dawn for Michel Talking Torque 4
motec 6.9 Dr Q 6.3 Silver Pig Motorsports 3
Oversize Silver 6.9 for Sale Gumtree/eBay/Facebook Listings 11
L How to Remove the Silver Grille at the Base of the Windscreen? Mercedes W116 8
Fotografa Silver Arrows Racing - Some awesome photos... Mercedes R/C107 1
SEL_69L Black Or Silver - Which Do You Like Better? Exteriors and Body Repairs 35
116Benz Ebay 350SE silver/red Gumtree/eBay/Facebook Listings 7
Des Silver AMG Mercedes W116 5
S Transmission - Valve Body Mechanicals 4
Oversize W116 Full Body Kit Spotto Exteriors and Body Repairs 8
simon-69 6.9 Intake Manifold & Throttle Body - Loctite Threadlocker vs Copper Anti-Seize Mechanicals 2
J 560 Throttle Body onto 6.9 Mechanicals 8
motec 6.9 Wanted M117 560 throttle body Gumtree/eBay/Facebook Listings 11
motec 6.9 W107 Wide body Mercedes R/C107 0
Oversize W116 Lorinser full body kit? Gumtree/eBay/Facebook Listings 11
S body dress strip Mercedes R/C107 2
Styria Valve Body - Ch.116 6.9 Technical Information 4
Oversize Late model body kits Gumtree/eBay/Facebook Listings 1
motec 6.9 w126 wide body for Michel Gumtree/eBay/Facebook Listings 2
motec 6.9 ugly w116 body kit Exteriors and Body Repairs 19
Styria Valve Body Removal Technical Information 2
motec 6.9 AMG full body kit Exteriors and Body Repairs 13
SELfor50 107 - Full AMG Body Kit Gumtree/eBay/Facebook Listings 3
M The Chronicles Of Mercules - Body Repairs Exteriors and Body Repairs 62
OzBenzHead body panel part numbers Exteriors and Body Repairs 2

Similar threads

Top